NOTE: This is draft WIP – 24.04 specific changes are to be added – this NOTE will be removed when the release notes have been finalised. Ubuntu Budgie 24.04 LTS (Noble Numbat) is a Long Term Support release with 3 years of support, from April 2024 to May 2027. These release notes takes the 22.10/23.04/23.10 and 24.04 developments and highlights the key parts that 22.04 upgraders need to be…
Years ago, at what I think I remember was DebConf 15, I hacked for a while
on debhelper to
write build-ids to debian binary control files,
so that the build-id (more specifically, the ELF note
.note.gnu.build-id) wound up in the Debian apt archive metadata.
I’ve always thought this was super cool, and seeing as how Michael Stapelberg
blogged
some great pointers around the ecosystem, including the fancy new debuginfod
service, and the
find-dbgsym-packages
helper, which uses these same headers, I don’t think I’m the only one.
At work I’ve been using a lot of rust,
specifically, async rust using tokio. To try and work on
my style, and to dig deeper into the how and why of the decisions made in these
frameworks, I’ve decided to hack up a project that I’ve wanted to do ever
since 2015 – write a debug filesystem. Let’s get to it.
Back to the Future
Time to admit something. I really love Plan 9. It’s
just so good. So many ideas from Plan 9 are just so prescient, and everything
just feels right. Not just right like, feels good – like, correct. The
bit that I’ve always liked the most is 9p, the network protocol for serving
a filesystem over a network. This leads to all sorts of fun programs, like the
Plan 9 ftp client being a 9p server – you mount the ftp server and access
files like any other files. It’s kinda like if fuse were more fully a part
of how the operating system worked, but fuse is all running client-side. With
9p there’s a single client, and different servers that you can connect to,
which may be backed by a hard drive, remote resources over something like SFTP, FTP, HTTP or even purely synthetic.
The interesting (maybe sad?) part here is that 9p wound up outliving Plan 9
in terms of adoption – 9p is in all sorts of places folks don’t usually expect.
For instance, the Windows Subsystem for Linux uses the 9p protocol to share
files between Windows and Linux. ChromeOS uses it to share files with Crostini,
and qemu uses 9p (virtio-p9) to share files between guest and host. If you’re
noticing a pattern here, you’d be right; for some reason 9p is the go-to protocol
to exchange files between hypervisor and guest. Why? I have no idea, except maybe
due to being designed well, simple to implement, and it’s a lot easier to validate the data being shared
and validate security boundaries. Simplicity has its value.
As a result, there’s a lot of lingering 9p support kicking around. Turns out
Linux can even handle mounting 9p filesystems out of the box. This means that I
can deploy a filesystem to my LAN or my localhost by running a process on top
of a computer that needs nothing special, and mount it over the network on an
unmodified machine – unlike fuse, where you’d need client-specific software
to run in order to mount the directory. For instance, let’s mount a 9p
filesystem running on my localhost machine, serving requests on 127.0.0.1:564
(tcp) that goes by the name “mountpointname” to /mnt.
Linux will mount away, and attach to the filesystem as the root user, and by default,
attach to that mountpoint again for each local user that attempts to use
it. Nifty, right? I think so. The server is able
to keep track of per-user access and authorization
along with the host OS.
WHEREIN I STYX WITH IT
Since I wanted to push myself a bit more with rust and tokio specifically,
I opted to implement the whole stack myself, without third party libraries on
the critical path where I could avoid it. The 9p protocol (sometimes called
Styx, the original name for it) is incredibly simple. It’s a series of client
to server requests, which receive a server to client response. These are,
respectively, “T” messages, which transmit a request to the server, which
trigger an “R” message in response (Reply messages). These messages are
TLV payload
with a very straight forward structure – so straight forward, in fact, that I
was able to implement a working server off nothing more than a handful of man
pages.
Later on after the basics worked, I found a more complete
spec page
that contains more information about the
unix specific variant
that I opted to use (9P2000.u rather than 9P2000) due to the level
of Linux specific support for the 9P2000.u variant over the 9P2000
protocol.
MR ROBOTO
The backend stack over at zoo is rust and tokio
running i/o for an HTTP and WebRTC server. I figured I’d pick something
fairly similar to write my filesystem with, since 9P can be implemented
on basically anything with I/O. That means tokio tcp server bits, which
construct and use a 9p server, which has an idiomatic Rusty API that
partially abstracts the raw R and T messages, but not so much as to
cause issues with hiding implementation possibilities. At each abstraction
level, there’s an escape hatch – allowing someone to implement any of
the layers if required. I called this framework
arigato which can be found over on
docs.rs and
crates.io.
/// Simplified version of the arigato File trait; this isn't actually
/// the same trait; there's some small cosmetic differences. The
/// actual trait can be found at:
///
/// https://docs.rs/arigato/latest/arigato/server/trait.File.html
trait File {
/// OpenFile is the type returned by this File via an Open call.
typeOpenFile: OpenFile;
/// Return the 9p Qid for this file. A file is the same if the Qid is
/// the same. A Qid contains information about the mode of the file,
/// version of the file, and a unique 64 bit identifier.
fnqid(&self) -> Qid;
/// Construct the 9p Stat struct with metadata about a file.
async fnstat(&self) -> FileResult<Stat>;
/// Attempt to update the file metadata.
async fnwstat(&mut self, s: &Stat) -> FileResult<()>;
/// Traverse the filesystem tree.
async fnwalk(&self, path: &[&str]) -> FileResult<(Option<Self>, Vec<Self>)>;
/// Request that a file's reference be removed from the file tree.
async fnunlink(&mut self) -> FileResult<()>;
/// Create a file at a specific location in the file tree.
async fncreate(
&mut self,
name: &str,
perm: u16,
ty: FileType,
mode: OpenMode,
extension: &str,
) -> FileResult<Self>;
/// Open the File, returning a handle to the open file, which handles
/// file i/o. This is split into a second type since it is genuinely
/// unrelated -- and the fact that a file is Open or Closed can be
/// handled by the `arigato` server for us.
async fnopen(&mut self, mode: OpenMode) -> FileResult<Self::OpenFile>;
}
/// Simplified version of the arigato OpenFile trait; this isn't actually
/// the same trait; there's some small cosmetic differences. The
/// actual trait can be found at:
///
/// https://docs.rs/arigato/latest/arigato/server/trait.OpenFile.html
trait OpenFile {
/// iounit to report for this file. The iounit reported is used for Read
/// or Write operations to signal, if non-zero, the maximum size that is
/// guaranteed to be transferred atomically.
fniounit(&self) -> u32;
/// Read some number of bytes up to `buf.len()` from the provided
/// `offset` of the underlying file. The number of bytes read is
/// returned.
async fnread_at(
&mut self,
buf: &mut [u8],
offset: u64,
) -> FileResult<u32>;
/// Write some number of bytes up to `buf.len()` from the provided
/// `offset` of the underlying file. The number of bytes written
/// is returned.
fnwrite_at(
&mut self,
buf: &mut [u8],
offset: u64,
) -> FileResult<u32>;
}
Thanks, decade ago paultag!
Let’s do it! Let’s use arigato to implement a 9p filesystem we’ll call
debugfs that will serve all the debug
files shipped according to the Packages metadata from the apt archive. We’ll
fetch the Packages file and construct a filesystem based on the reported
Build-Id entries. For those who don’t know much about how an apt repo
works, here’s the 2-second crash course on what we’re doing. The first is to
fetch the Packages file, which is specific to a binary architecture (such as
amd64, arm64 or riscv64). That architecture is specific to a
component (such as main, contrib or non-free). That component is
specific to a suite, such as stable, unstable or any of its aliases
(bullseye, bookworm, etc). Let’s take a look at the Packages.xz file for
the unstable-debugsuite, maincomponent, for all amd64 binaries.
This will return the Debian-style
rfc2822-like headers,
which is an export of the metadata contained inside each .deb file which
apt (or other tools that can use the apt repo format) use to fetch
information about debs. Let’s take a look at the debug headers for the
netlabel-tools package in unstable – which is a package named
netlabel-tools-dbgsym in unstable-debug.
So here, we can parse the package headers in the Packages.xz file, and store,
for each Build-Id, the Filename where we can fetch the .deb at. Each
.deb contains a number of files – but we’re only really interested in the
files inside the .deb located at or under /usr/lib/debug/.build-id/,
which you can find in debugfs under
rfc822.rs. It’s
crude, and very single-purpose, but I’m feeling a bit lazy.
Who needs dpkg?!
For folks who haven’t seen it yet, a .deb file is a special type of
.ar file, that contains (usually)
three files inside – debian-binary, control.tar.xz and data.tar.xz.
The core of an .ar file is a fixed size (60 byte) entry header,
followed by the specified size number of bytes.
[8 byte .ar file magic]
[60 byte entry header]
[N bytes of data]
[60 byte entry header]
[N bytes of data]
[60 byte entry header]
[N bytes of data]
...
First up was to implement a basic ar parser in
ar.rs. Before we get
into using it to parse a deb, as a quick diversion, let’s break apart a .deb
file by hand – something that is a bit of a rite of passage (or at least it
used to be? I’m getting old) during the Debian nm (new member) process, to take
a look at where exactly the .debug file lives inside the .deb file.
$ ar x netlabel-tools-dbgsym_0.30.0-1+b1_amd64.deb
$ ls
control.tar.xz debian-binary
data.tar.xz netlabel-tools-dbgsym_0.30.0-1+b1_amd64.deb
$ tar --list -f data.tar.xz | grep '.debug$'
./usr/lib/debug/.build-id/e5/9f81f6573dadd5d95a6e4474d9388ab2777e2a.debug
Since we know quite a bit about the structure of a .deb file, and I had to
implement support from scratch anyway, I opted to implement a (very!) basic
debfile parser using HTTP Range requests. HTTP Range requests, if supported by
the server (denoted by a accept-ranges: bytes HTTP header in response to an
HTTP HEAD request to that file) means that we can add a header such as
range: bytes=8-68 to specifically request that the returned GET body be the
byte range provided (in the above case, the bytes starting from byte offset 8
until byte offset 68). This means we can fetch just the ar file entry from
the .deb file until we get to the file inside the .deb we are interested in
(in our case, the data.tar.xz file) – at which point we can request the body
of that file with a final range request. I wound up writing a struct to
handle a read_at-style API surface in
hrange.rs, which
we can pair with ar.rs above and start to find our data in the .deb remotely
without downloading and unpacking the .deb at all.
After we have the body of the data.tar.xz coming back through the HTTP
response, we get to pipe it through an xz decompressor (this kinda sucked in
Rust, since a tokioAsyncRead is not the same as an http Body response is
not the same as std::io::Read, is not the same as an async (or sync)
Iterator is not the same as what the xz2 crate expects; leading me to read
blocks of data to a buffer and stuff them through the decoder by looping over
the buffer for each lzma2 packet in a loop), and tarfile parser (similarly
troublesome). From there we get to iterate over all entries in the tarfile,
stopping when we reach our file of interest. Since we can’t seek, but gdb
needs to, we’ll pull it out of the stream into a Cursor<Vec<u8>> in-memory
and pass a handle to it back to the user.
I was originally hoping to avoid transferring the whole tar file over the
network (and therefore also reading the whole debug file into ram, which
objectively sucks), but quickly hit issues with figuring out a way around
seeking around an xz file. What’s interesting is xz has a great primitive
to solve this specific problem (specifically, use a block size that allows you
to seek to the block as close to your desired seek position just before it,
only discarding at most block size - 1 bytes), but data.tar.xz files
generated by dpkg appear to have a single mega-huge block for the whole file.
I don’t know why I would have expected any different, in retrospect. That means
that this now devolves into the base case of “How do I seek around an lzma2
compressed data stream”; which is a lot more complex of a question.
Thankfully, notoriously brilliant tianon was
nice enough to introduce me to Jon Johnson
who did something super similar – adapted a technique to seek inside a
compressed gzip file, which lets his service
oci.dag.dev
seek through Docker container images super fast based on some prior work
such as soci-snapshotter, gztool, and
zran.c.
He also pulled this party trick off for apk based distros
over at apk.dag.dev, which seems apropos.
Jon was nice enough to publish a lot of his work on this specifically in a
central place under the name “targz”
on his GitHub, which has been a ton of fun to read through.
The gist is that, by dumping the decompressor’s state (window of previous
bytes, in-memory data derived from the last N-1 bytes) at specific
“checkpoints” along with the compressed data stream offset in bytes and
decompressed offset in bytes, one can seek to that checkpoint in the compressed
stream and pick up where you left off – creating a similar “block” mechanism
against the wishes of gzip. It means you’d need to do an O(n) run over the
file, but every request after that will be sped up according to the number
of checkpoints you’ve taken.
Given the complexity of xz and lzma2, I don’t think this is possible
for me at the moment – especially given most of the files I’ll be requesting
will not be loaded from again – especially when I can “just” cache the debug
header by Build-Id. I want to implement this (because I’m generally curious
and Jon has a way of getting someone excited about compression schemes, which
is not a sentence I thought I’d ever say out loud), but for now I’m going to
move on without this optimization. Such a shame, since it kills a lot of the
work that went into seeking around the .deb file in the first place, given
the debian-binary and control.tar.gz members are so small.
The Good
First, the good news right? It works! That’s pretty cool. I’m positive
my younger self would be amused and happy to see this working; as is
current day paultag. Let’s take debugfs out for a spin! First, we need
to mount the filesystem. It even works on an entirely unmodified, stock
Debian box on my LAN, which is huge. Let’s take it for a spin:
And, let’s prove to ourselves that this actually mounted before we go
trying to use it:
$ mount | grep build-id
192.168.0.2 on /usr/lib/debug/.build-id type 9p (rw,relatime,aname=unstable-debug,access=user,trans=tcp,version=9p2000.u,port=564)
Slick. We’ve got an open connection to the server, where our host
will keep a connection alive as root, attached to the filesystem provided
in aname. Let’s take a look at it.
$ ls /usr/lib/debug/.build-id/
00 0d 1a 27 34 41 4e 5b 68 75 82 8E 9b a8 b5 c2 CE db e7 f3
01 0e 1b 28 35 42 4f 5c 69 76 83 8f 9c a9 b6 c3 cf dc E7 f4
02 0f 1c 29 36 43 50 5d 6a 77 84 90 9d aa b7 c4 d0 dd e8 f5
03 10 1d 2a 37 44 51 5e 6b 78 85 91 9e ab b8 c5 d1 de e9 f6
04 11 1e 2b 38 45 52 5f 6c 79 86 92 9f ac b9 c6 d2 df ea f7
05 12 1f 2c 39 46 53 60 6d 7a 87 93 a0 ad ba c7 d3 e0 eb f8
06 13 20 2d 3a 47 54 61 6e 7b 88 94 a1 ae bb c8 d4 e1 ec f9
07 14 21 2e 3b 48 55 62 6f 7c 89 95 a2 af bc c9 d5 e2 ed fa
08 15 22 2f 3c 49 56 63 70 7d 8a 96 a3 b0 bd ca d6 e3 ee fb
09 16 23 30 3d 4a 57 64 71 7e 8b 97 a4 b1 be cb d7 e4 ef fc
0a 17 24 31 3e 4b 58 65 72 7f 8c 98 a5 b2 bf cc d8 E4 f0 fd
0b 18 25 32 3f 4c 59 66 73 80 8d 99 a6 b3 c0 cd d9 e5 f1 fe
0c 19 26 33 40 4d 5a 67 74 81 8e 9a a7 b4 c1 ce da e6 f2 ff
Outstanding. Let’s try using gdb to debug a binary that was provided by
the Debian archive, and see if it’ll load the ELF by build-id from the
right .deb in the unstable-debug suite:
$ gdb -q /usr/sbin/netlabelctl
Reading symbols from /usr/sbin/netlabelctl...
Reading symbols from /usr/lib/debug/.build-id/e5/9f81f6573dadd5d95a6e4474d9388ab2777e2a.debug...
(gdb)
Yes! Yes it will!
$ file /usr/lib/debug/.build-id/e5/9f81f6573dadd5d95a6e4474d9388ab2777e2a.debug
/usr/lib/debug/.build-id/e5/9f81f6573dadd5d95a6e4474d9388ab2777e2a.debug: ELF 64-bit LSB shared object, x86-64, version 1 (SYSV), dynamically linked, interpreter *empty*, BuildID[sha1]=e59f81f6573dadd5d95a6e4474d9388ab2777e2a, for GNU/Linux 3.2.0, with debug_info, not stripped
The Bad
Linux’s support for 9p is mainline, which is great, but it’s not robust.
Network issues or server restarts will wedge the mountpoint (Linux can’t
reconnect when the tcp connection breaks), and things that work fine on local
filesystems get translated in a way that causes a lot of network chatter – for
instance, just due to the way the syscalls are translated, doing an ls, will
result in a stat call for each file in the directory, even though linux had
just got a stat entry for every file while it was resolving directory names.
On top of that, Linux will serialize all I/O with the server, so there’s no
concurrent requests for file information, writes, or reads pending at the same
time to the server; and read and write throughput will degrade as latency
increases due to increasing round-trip time, even though there are offsets
included in the read and write calls. It works well enough, but is
frustrating to run up against, since there’s not a lot you can do server-side
to help with this beyond implementing the 9P2000.L variant (which, maybe is
worth it).
The Ugly
Unfortunately, we don’t know the file size(s) until we’ve actually opened the
underlying tar file and found the correct member, so for most files, we don’t
know the real size to report when getting a stat. We can’t parse the tarfiles
for every stat call, since that’d make ls even slower (bummer). Only
hiccup is that when I report a filesize of zero, gdb throws a bit of a
fit; let’s try with a size of 0 to start:
$ ls -lah /usr/lib/debug/.build-id/e5/9f81f6573dadd5d95a6e4474d9388ab2777e2a.debug
-r--r--r-- 1 root root 0 Dec 31 1969 /usr/lib/debug/.build-id/e5/9f81f6573dadd5d95a6e4474d9388ab2777e2a.debug
$ gdb -q /usr/sbin/netlabelctl
Reading symbols from /usr/sbin/netlabelctl...
Reading symbols from /usr/lib/debug/.build-id/e5/9f81f6573dadd5d95a6e4474d9388ab2777e2a.debug...
warning: Discarding section .note.gnu.build-id which has a section size (24) larger than the file size [in module /usr/lib/debug/.build-id/e5/9f81f6573dadd5d95a6e4474d9388ab2777e2a.debug]
[...]
This obviously won’t work since gdb will throw away all our hard work because
of stat’s output, and neither will loading the real size of the underlying
file. That only leaves us with hardcoding a file size and hope nothing else
breaks significantly as a result. Let’s try it again:
$ ls -lah /usr/lib/debug/.build-id/e5/9f81f6573dadd5d95a6e4474d9388ab2777e2a.debug
-r--r--r-- 1 root root 954M Dec 31 1969 /usr/lib/debug/.build-id/e5/9f81f6573dadd5d95a6e4474d9388ab2777e2a.debug
$ gdb -q /usr/sbin/netlabelctl
Reading symbols from /usr/sbin/netlabelctl...
Reading symbols from /usr/lib/debug/.build-id/e5/9f81f6573dadd5d95a6e4474d9388ab2777e2a.debug...
(gdb)
Much better. I mean, terrible but better. Better for now, anyway.
Kilroy was here
Do I think this is a particularly good idea? I mean; kinda. I’m probably going
to make some fun 9parigato-based filesystems for use around my LAN, but I
don’t think I’ll be moving to use debugfs until I can figure out how to
ensure the connection is more resilient to changing networks, server restarts
and fixes on i/o performance. I think it was a useful exercise and is a pretty
great hack, but I don’t think this’ll be shipping anywhere anytime soon.
Along with me publishing this post, I’ve pushed up all my repos; so you
should be able to play along at home! There’s a lot more work to be done
on arigato; but it does handshake and successfully export a working
9P2000.u filesystem. Check it out on on my github at
arigato,
debugfs
and also on crates.io
and docs.rs.
At least I can say I was here and I got it working after all these years.
It has been a very busy couple of weeks as we worked against some major transitions and a security fix that required a rebuild of the $world. I am happy to report that against all odds we have a beta release! You can read all about it here: https://kubuntu.org/news/kubuntu-24-04-beta-released/ Post beta freeze I have already begun pushing our fixes for known issues today. A big one being our new branding! Very exciting times in the Kubuntu world.
In the snap world I will be using my free time to start knocking out KDE applications ( not covered by the project ). I have also recruited some help, so you should start seeing these pop up in the edge channel very soon!
Now that we are nearing the release of Noble Numbat, my contract is coming to an end with Kubuntu. If you would like to see Plasma 6 in the next release and in a PPA for Noble, please consider donating to extend my contract at https://kubuntu.org/donate !
Test Kubuntu 24.04 Beta and Experience Innovation with KubuQA!
We’re thrilled to announce the availability of the Kubuntu 24.04 Beta! This release is packed with new features and enhancements, and we’re inviting you, our valued community, to join us in fine-tuning this exciting new version. Whether you’re a seasoned tester or new to software testing, your feedback is crucial to making Kubuntu 24.04 the best it can be.
To make your testing journey as easy as pie, we’re introducing a fantastic new tool: KubuQA. Designed with both new and experienced users in mind, KubuQA simplifies the testing process by automating the download, VirtualBox setup, and configuration steps. Now, everyone can participate in testing Kubuntu with ease!
This beta release also debuts our fresh new branding, artwork, and wallpapers—created and chosen by our own community through recent branding and wallpaper contests. These additions reflect the spirit and creativity of the Kubuntu family, and we can’t wait for you to see them.
Get Testing
By participating in the beta testing of Kubuntu 24.04, you’re not just helping improve the software; you’re becoming an integral part of a global community that values open collaboration and innovation. Your contributions help us identify and fix issues, ensuring Kubuntu remains a high-quality, stable, and user-friendly Linux distribution.
The benefits of joining our testing team extend beyond improving the software. You’ll gain valuable experience, meet like-minded individuals, and perhaps discover a new passion in the world of open-source software.
So why wait? Download the Kubuntu 24.04 Beta today, try out KubuQA, or follow our wiki to upgrade and help us make Kubuntu better than ever! Remember, your feedback is the key to our success.
Ready to make an impact?
Join us in this exciting phase of development and see your ideas come to life in Kubuntu. Plus, enjoy the satisfaction of knowing that you’ve contributed to a project used by millions around the world. Become a tester today and be part of something big!
Interested in more than testing?
By the way, have you thought about becoming a member of the Kubuntu Community? It’s a fantastic way to contribute more actively and help shape the future of Kubuntu. Learn more about joining the community.
The Ubuntu team is pleased to announce the Beta release of the Ubuntu 24.04 LTS Desktop, Server, and Cloud products.
Ubuntu 24.04 LTS, codenamed “Noble Numbat”, continues Ubuntu’s proud tradition of integrating the latest and greatest open source technologies into a high-quality, easy-to-use Linux distribution. The team has been very hard at work through this cycle, introducing new features and fixing bugs.
This Beta release includes images from not only the Ubuntu Desktop, Server, and Cloud products, but also the Edubuntu, Kubuntu, Lubuntu, Ubuntu Budgie, Ubuntu Cinnamon, UbuntuKylin, Ubuntu MATE, Ubuntu Studio, Ubuntu Unity and Xubuntu flavors.
The Beta images are known to be reasonably free of showstopper image build or installer bugs, while representing a very recent snapshot of Ubuntu 24.04 LTS that should be representative of the features intended to ship with the final release expected on April 25, 2024.
Ubuntu, Ubuntu Server, Cloud Images:
Noble Beta includes updated versions of most of our core set of packages, including a current 6.8 kernel, and much more.
To upgrade to Ubuntu 24.04 LTS Beta from Ubuntu 23.10 or Ubuntu 22.04 LTS, follow these instructions:
As fixes will be included in new images between now and release, any daily cloud image from today or later (i.e. a serial of 20240411 or higher) should be considered a Beta image. Bugs found should be filed against the appropriate packages or, failing that, the cloud-images project in Launchpad.
The full release notes for Ubuntu 24.04 LTS Beta can be found at:
Lubuntu is a flavor of Ubuntu which uses the Lightweight Qt Desktop Environment (LXQt). The project’s goal is to provide a lightweight yet functional Linux distribution based on a rock-solid Ubuntu base.
Ubuntu Studio is a flavor of Ubuntu that provides a full range of multimedia content creation applications for each key workflow: audio, graphics, video, photography and publishing.
Ubuntu is a full-featured Linux distribution for clients, servers and clouds, with a fast and easy installation and regular releases. A tightly-integrated selection of excellent applications is included, and an incredible variety of add-on software is just a few clicks away.
Professional technical support is available from Canonical Limited and hundreds of other companies around the world. For more information about support, visit
The Ubuntu Studio team is pleased to announce the beta release of Ubuntu Studio 24.04 LTS, codenamed “Noble Numbat”.
While this beta is reasonably free of any showstopper installer bugs, you will find some bugs within. This image is, however, mostly representative of what you will find when Ubuntu Studio 24.04 is released on April 25, 2024.
Special Notes
The Ubuntu Studio 24.04 LTS disk image (ISO) exceeds 4 GB and cannot be downloaded to some file systems such as FAT32 and may not be readable when burned to a DVD. For this reason, we recommend downloading to a compatible file system. When creating a boot medium, we recommend creating a bootable USB stick with the ISO image or burning to a Dual-Layer DVD.
Full updated information, including Upgrade Instructions, are available in the Release Notes.
Please note that upgrading before the release of 24.04.1,due August 2024, is unsupported.
New Features This Release
PipeWire continues to improve with every release and is so robust it can be used for professional and prosumer use. Version 1.0.4
Ubuntu Studio Installer‘s included Ubuntu Studio Audio Configurationutility for fine-tuning the PipeWire setup or changing the configuration altogether now includes the ability to create or remove a dummy audio device. Version 1.9
Major Package Upgrades
Ardour version 8.4.0
Qtractor version 0.9.39
OBS Studio version 30.0.2
Audacity version 3.4.2
digiKam version 8.2.0
Kdenlive version 23.08.5
Krita version 5.2.2
There are many other improvements, too numerous to list here. We encourage you to look around the freely-downloadable ISO image.
Known Issues
Ubuntu Studio’s classic PulseAudio-JACK configuration cannot be used on Ubuntu Desktop (GNOME) due to a known issue with the ubuntu-desktop metapackage. (LP: #2033440)
We now discourage the use of the aforementioned classic PulseAudio-JACK configuration as PulseAudio is becoming deprecated with time in favor of PipeWire. PipeWire’s JACK configuration can be disabled to use JACK2 via QJackCTL for advanced users.
Due to the Ubuntu repositories being in-flux following the time_t transition and xz-utils security issue resolution, some items in the repository are uninstallable or causing other packaging conflicts. The Ubuntu Release Team is working around the clock to help resolve these issues, so patience is required.
Additionally, we need financial contributions. Our project lead, Erich Eickmeyer, is working long hours on this project and trying to generate a part-time income. See this post as to the reasons why and go here to see how you can contribute financially (options are also in the sidebar).
Frequently Asked Questions
Q: Does Ubuntu Studio contain snaps? A: Yes. Mozilla’s distribution agreement with Canonical changed, and Ubuntu was forced to no longer distribute Firefox in a native .deb package. We have found that, after numerous improvements, Firefox now performs just as well as the native .deb package did.
Thunderbird has become a snap this cycle in order for the maintainers to get security patches delivered faster.
Additionally, Freeshow is an Electron-based application. Electron-based applications cannot be packaged in the Ubuntu repositories in that they cannot be packaged in a traditional Debian source package. While such apps do have a build system to create a .deb binary package, it circumvents the source package build system in Launchpad, which is required when packaging for Ubuntu. However, Electron apps also have a facility for creating snaps, which can be uploaded and included. Therefore, for Freeshow to be included in Ubuntu Studio, it had to be packaged as a snap.
Q: If I install this Beta release, will I have to reinstall when the final release comes out? A: No. If you keep it updated, your installation will automatically become the final release. However, if Audacity returns to the Ubuntu repositories before final release, then you might end-up with a double-installation of Audacity. Removal instructions of one or the other will be made available in a future post.
Q: Will you make an ISO with {my favorite desktop environment}? A: To do so would require creating an entirely new flavor of Ubuntu, which would require going through the Official Ubuntu Flavor application process. Since we’re completely volunteer-run, we don’t have the time or resources to do this. Instead, we recommend you download the official flavor for the desktop environment of your choice and use Ubuntu Studio Installer to get Ubuntu Studio – which does *not* convert that flavor to Ubuntu Studio but adds its benefits.
Q: What if I don’t want all these packages installed on my machine? A: Simply use the Ubuntu Studio Installer to remove the features of Ubuntu Studio you don’t want or need!
We are happy to announce the Beta release for Lubuntu Noble (what will become 24.04 LTS)! What makes this cycle unique? Lubuntu is a lightweight flavor of Ubuntu, based on LXQt and built for you. As an official flavor, we benefit from Canonical’s infrastructure and assistance, in addition to the support and enthusiasm from the […]
This blog is co-authored by Gordan Markuš, Canonical and Kumar Sankaran, Ventana Micro Systems
Unlocking the future of semiconductor innovation
RISC-V, an open standard instruction set architecture (ISA), is rapidly shaping the future of high-performance computing, edge computing, and artificial intelligence. The RISC-V customizable and scalable ISA enables a new era of processor innovation and efficiency. Furthermore, RISC-V democratizes innovation by allowing new companies to develop their own products on its open ISA, breaking down barriers to entry and fostering a diverse ecosystem of technological advancement.
By fostering a more open and innovative approach to product design, the RISC-V technology vendors are not just a participant in the future of technology; they are a driving force behind the evolution of computing across multiple domains. Its impact extends from the cloud to the edge:
In modern data centers, enterprises seek a range of infrastructure solutions to support the breadth of modern workloads and requirements. RISC-V provides a versatile solution, offering a comprehensive suite of IP cores under a unified ISA that scales efficiently across various applications. This scalability and flexibility makes RISC-V an ideal foundation for addressing the diverse demands of today’s data center environments.
In HPC, its adaptability allows for the creation of specialized processors that can handle complex computations at unprecedented speeds, while also offering a quick time to market for product builders.
For edge computing, RISC-V’s efficiency and the ability to tailor processors for specific tasks mean devices can process more data locally, reducing latency and the need for constant cloud connectivity.
In the realm of AI, the flexibility of RISC-V paves the way for the development of highly optimized AI chips. These chips can accelerate machine learning tasks by executing AI centric computations more efficiently, thus speeding up the training and inference of AI workloads.
One of the unique products that can be designed with RISC-V ISA are chiplets. Chiplets are smaller, modular blocks of silicon that can be integrated to form a larger, more complex chip. Instead of designing a single monolithic chip, a process that is increasingly challenging and expensive at cutting-edge process nodes, manufacturers can create chiplets that specialize in different functions and combine them as needed. RISC-V and chiplet technology is empowering a new era of chip design, enabling more companies to participate in innovation and tailor their products to specific market needs with unprecedented flexibility and cost efficiency.
Ventana and Canonical partnership and technology leadership
Canonical makes open source secure, reliable and easy to use, providing support for Ubuntu and a growing portfolio of enterprise-grade open source technologies. One of the key missions of Canonical is to improve the open source experience across ISA architectures. At the end of 2023, Canonical announced joining the RISC-V Software Ecosystem (RISE) community to support the open source community and ecosystem partners in bringing the best of Ubuntu and open source to RISC-V platforms.
As a part of our collaboration with the ecosystem, Canonical has been working closely with Ventana Micro Systems (Ventana). Ventana is delivering a family of high-performance RISC-V data center-class CPUs delivered in the form of multi-core chiplets or core IP for high-performance applications in the cloud, enterprise data center, hyperscale, 5G, edge compute, AI/ML and automotive markets.
The relationship between Canonical and Ventana started with a collaboration on improving the upstream software availability of RISC-V in projects such as u-boot, EDKII and the Linux kernel.
Over time, the teams have started enabling Ubuntu on Ventana’s Veyron product family. Through the continuous efforts of this partnership Ubuntu is available on the Ventana Veyron product family and as a part of Ventana’s Veyron Software Development Kit (SDK).
Furthermore, the collaboration extends to building full solutions for the datacenter, HPC, AI/ML and Automotive, integrating Domain Specific Accelerators (DSAs) and SDKs, promising to unlock new levels of performance and efficiency for developers and enterprises alike. Some of the targeted software stacks can be seen in the figure below.
Today, Ventana and Canonical collaborate on a myriad of topics. Together through their joint efforts across open source communities and as a part of RISC-V Software Ecosystem (RISE), Ventana and Canonical are actively contributing to the growth of the RISC-V ecosystem. We are proud of the innovation and technology leadership our partnership brings to the ecosystem.
Enabling the ecosystem with enterprise-grade and easy to consume open source on RISC-V platforms
Ubuntu is the reference OS for innovators and developers, but also the vehicle to enable enterprises to take products to market faster. Ubuntu enables teams to focus on their core applications without worrying about the stability of the underlying frameworks. Ventana and the RISC-V ecosystem recognise the value of Ubuntu and are using it as a base platform for their innovation.
Furthermore, the availability of Ubuntu on RISC-V platforms not only allows developers to prototype their solutions easily but provides a path to market with enterprise-grade, secure and supported open source solutions.Whether it’s for networking offloads in the data center, training AI models in the cloud, or running AI inference at the edge, Ubuntu is an established platform of choice.
Learn more about Canonical’s engagement in the RISC-V ecosystem
Artificial intelligence is the most exciting technology revolution of recent years. Nvidia, Intel, AMD and others continue to produce faster and faster GPU’s enabling larger models, and higher throughput in decision making processes.
Outside of the immediate AI-hype, one area still remains somewhat overlooked: AI needs data (find out more here). First and foremost, storage systems need to provide high performance access to ever growing datasets, but more importantly they need to ensure that this data is securely stored, not just for the present, but also for the future.
There are multiple different types of data used in typical AI systems:
Raw and pre-processed data
Training data
Models
Results
All of this data takes time and computational effort to collect, process and output, and as such need to be protected. In some cases, like telemetry data from a self-driving car, this data might never be able to be reproduced. Even after training data is used to create a model, its value is not diminished; improvements to models require consistent training data sets so that any adjustments can be fairly benchmarked.
Raw, pre-processed, training and results data sets can contain personally identifiable information and as such steps need to be taken to ensure that it is stored in a secure fashion. And more than just the moral responsibility of safely storing data, there can be significant penalties associated with data breaches.
Challenges with securely storing AI data
We covered many of the risks associated with securely storing data in this blog post. The same risks apply in an AI setting as well. Afterall machine learning is another application that consumes storage resources, albeit sometimes at a much larger scale.
AI use cases are relatively new, however the majority of modern storage systems, including the open source solutions like Ceph, have mature features that can be used to mitigate these risks.
Physical theft thwarted by data at rest encryption
Any disk used in a storage system could theoretically be lost due to theft, or when returned for warranty replacement after a failure event. By using at rest encryption, every byte of data stored on a disk, spinning media, or flash, is useless without the cryptographic keys needed to unencrypt the data. Thus protecting sensitive data, or proprietary models created after hours or even days of processing.
Strict access control to keep out uninvited guests
A key tenet of any system design is ensuring that users (real people, or headless accounts) have access only to the resources they need, and that at any time that access can easily be removed. Storage systems like Ceph use both their own access control mechanisms and also integrate with centralised auth systems like LDAP to allow easy access control.
Eavesdropping defeated by in flight encryption
There is nothing worse than someone listening into a conversation that they should not be privy to. The same thing can happen in computer networks too. By employing encryption on all network flows: client to storage, and internal storage system networks no data can be leaked to 3rd parties eavesdropping on the network.
Recover from ransomware with snapshots and versioning
It seems like every week another large enterprise has to disclose a ransomware event, where an unauthorised 3rd party has taken control of their systems and encrypted the data. Not only does this lead to downtime but also the possibility of having to pay a ransom for the decryption key to regain control of their systems and access to their data. AI projects often represent a significant investment of both time and resources, so having an initiative undermined by a ransomware attack could be highly damaging.
Using point in time snapshots or versioning of objects can allow an organisation to revert to a previous non-encrypted state, and potentially resume operations sooner.
Learn more
Ceph is one storage solution that can be used to store various AI datasets, and is not only scalable to meet performance and capacity requirements, but also has a number of features to ensure data is stored securely.
Find out more about how Ceph solves AI storage challenges:
Viajámos até Évora, para a Wikicon Portugal 2024, que decorreu de 5 a 7 de Abril, na Biblioteca Pública. Conversámos com alguns participantes e aprofundámos alguns temas abordados nas comunicações, que nos ajudam a perceber o que é o universo Wikimedia: as comunidades que dele fazem parte, a sua cultura colaborativa em modelo "open source" e como partilham semelhanças com o Software Livre e a Cultura dos Comuns. Neste primeiro episódio falámos com o André Barbosa durante a viagem de ida, antecipando o programa da Wikicon e trazemo-vos também alguns momentos de reportagem noutros espaços da cidade (incluindo uma conversa com Paula Simões, da D3). Nos episódios seguintes serão publicadas outras conversas, aqui ou no podcast "Voz dos Direitos Digitais" - com Sofia Matias, Danielly Figueiredo, Vanessa Sanches, Isabel Branco e Rita Duarte.
Podem apoiar o podcast usando os links de afiliados do Humble Bundle, porque ao usarem esses links para fazer uma compra, uma parte do valor que pagam reverte a favor do Podcast Ubuntu Portugal.
E podem obter tudo isso com 15 dólares ou diferentes partes dependendo de pagarem 1, ou 8.
Achamos que isto vale bem mais do que 15 dólares, pelo que se puderem paguem mais um pouco mais visto que têm a opção de pagar o quanto quiserem.
Se estiverem interessados em outros bundles não listados nas notas usem o link https://www.humblebundle.com/?partner=PUP e vão estar também a apoiar-nos.
We are thrilled to announce the winners of the Kubuntu Brand Graphic Design contest and the Wallpaper Contest! These competitions brought out the best in creativity, innovation, and passion from the Kubuntu community, and we couldn’t be more pleased with the results.
Kubuntu Brand Graphic Design Contest Winners
The Kubuntu Council is excited to reveal that after much deliberation and awe at the sheer talent on display, the winner of the Kubuntu Brand Graphic Design contest is Fabio Maricato! Fabio’s entry captivated us with its innovative approach and deep understanding of the Kubuntu brand essence. Coming in a close second is Desodi, whose creative flair and original design impressed us all. In third place, we have John Tolorunlojo, whose submission showcased exceptional creativity and skill.
Wallpaper Contest Honours
For the Wallpaper Contest, we had the pleasure of selecting three outstanding entries that will grace the screens of Kubuntu 24.04 LTS users worldwide. Congratulations to Gregorio, Dilip, and Jack Sharp for their stunning wallpaper contributions. Each design brings a unique flavor to the Kubuntu desktop experience, embodying the spirit of our community.
A Heartfelt Thank You
We extend our deepest gratitude to every participant who shared their artistry and vision with us. The number and quality of the submissions were truly beyond our expectations, reflecting the vibrant and creative spirit of the Kubuntu community. It’s your passion and engagement that make Kubuntu not just a powerful operating system, but a canvas for creativity.
Looking Ahead
The Kubuntu Council is thrilled with the success of these contests, and we are already looking forward to future opportunities to showcase the talents within our community. We believe that these winning designs not only celebrate the individuals behind them but also symbolise the collective creativity and innovation that Kubuntu stands for.
Stay tuned for the official inclusion of the winning wallpaper designs in Kubuntu 24.04 LTS, and keep an eye on our website for future contests and community events.
Once again, congratulations to our winners and a massive thank you to all who participated. Your contributions continue to shape and enrich the Kubuntu experience for users around the globe.
Celebrate with Us!
Check out our special banner commemorating the announcement and join us in celebrating the creativity and dedication of our winners and participants alike. Your efforts have truly made this contest a memorable one.
Here’s to many more years of innovation, creativity, and community in the world of Kubuntu.
The results of our contest, our proudly displayed in our Github Repository
This is the seventh in an increasingly infrequent series of Friday Tales From Tech Support. Some stories from the past featuring broken computers and even more broken tech support operatives - mostly me.
London. Summer 2002
In the early 2000s I worked as a SAP Technical Consultant which involved teaching courses, advising customers, and doing SAP installations, upgrades and migrations.
This story starts on a typical mid-summer, warm and stuffy day in London. I arrive for the first and only time to a small, second-floor office in a side road, just off Regent Street, in the centre of town. The office was about the size and shape of Sherlock’s flat in the modern hit BBC TV show of the same name, and was clearly previously residential accomodation, lightly converted.
The company was a small SAP Consultancy whose employees were mostly out of the office, clocking up billable hours on-site with their customers. Only a few staff remained in the office, including the CEO, an office administrator, and one consultant.
In the main lounge area of the office were three desks, roughly arranged. A further, larger desk was located in an adjoining office, likely previously a bedroom, where the CEO sat. Every desk had the typical arrangement office desk phone, Compaq Laptop PC, trailing cables and stationery.
In addition, dominating the main office, in the middle of the floor, was an ominous, noisy, and very messily populated 42U rack. It had no doors, and there was no air conditioning to speak of. The traditional sash windows were open, allowing the hot air from outside the flat to mix with the hotter air within.
It was like a sauna in there.
Rack space
My (thankfully) single-day job was to perform some much-needed software upgrades on a server in the rack. Consultancies like these often had their own internal development SAP systems which they’d use to prototype on, make demos, or develop entire solutions with.
Their SAP system was installed on enormous Compaq Proliant server, mounted in the middle of the rack. It featured the typical beige Compaq metalwork with an array of drives to hold the OS, database, application and data. Under that was a DLT 40-80 tape drive for doing backups, and a pile of tapes.
There was a keyboard and display in the rack, which was powered off, and disconnected. I was told the display would frequenly get “borrowed” to give impromptu presentations in the CEOs office. So they tended to use VNC or RDP into Windows to remotely administer the server, whether via the Internet, or locally from their desk in the office.
Some assorted networking and other random gear that I didn’t recognise was scattered around a mix of cables in the rack.
Time is ticking
There was clearly some pressure to get the software upgrades done promptly, ready for a customer demo or something I wasn’t privy to the details of. I was just told to “upgrade the box, and get it done today.”
I got myself on the network and quickly became familiar with the setup, or so I thought. I started a backup, like a good sysadmin, because from what I could tell, they hadn’t done one recently. (See tfts passim for further backup-related tales.)
I continued with the upgrade, which required numerous components to be updated and restarted, as is the way. Reboots, updates, more reboots, patches, SAP System Kernel updates, SAP Support Packages, yadda yadda.
Trouble brewing
While I was immersed in my world of downloading and patching, something was amiss. The office administrator and the CEO were taking calls, transferring calls, and shouting to eachother from the lounge office to the bedroom office. There was an air of frustration in the room, but it was none of my business.
Apparently some Very Important People were supposed to be having High Level conversations on the phone, but they kept getting cut off, or the call would drop, or something. Again, none of my business, just background noise while I was working to a deadline.
Except it was made my business.
After a lot of walking back-and-forth between the the offices, shouting, and picking up and slamming down phones, the CEO came to me and bluntly asked me:
What did you do?
This was an excellent question, that I didn’t have a great answer for besides:
I dunno, what did I do?
Greensleeves
It turns out the whole kerfuffle was because I had unwittinglydonesomething.
I was unaware that not only was the server running the very powerful, very complex, and very important SAP Enterprise Resource Planning software.
It also ran the equally important and business critical application and popular MP3 player: WinAmp.
There was a sound card in the server. The output of which was sent via an innocuous-looking audio cable to the telephony system.
The Important People were calling in, getting transferred to the CEOs phone, then upon hearing silence, assumed the call had dropped, and hang up. They would then call back, with everyone getting increasingly frustrated in the process.
The very familiar yellow ’lightning bolt’ WinAmp icon, which nestled in the Windows System Tray Notification Area had gone completely unnoticed by me.
When I had rebooted the server, WinAmp didn’t auto-start, so no music played out to telephone callers who were on hold. At best they got silence, and at worst, static or 50Hz mains hum.
The now-stroppy CEO stomped over to the rack and wrestled with the display to re-attach it, along with a keyboard & mouse to the server. He then used them to log-in to the Windows 2000 desktop, launch WinAmp manually, load a playlist, and hit play.
I apologised, completed my work, said goodbye, and thankfully for everyone involved, never went back to that London hot-box again.
And it’s finally out, our first LTS (Long Term Support) release of Incus!
For anyone unfamiliar, Incus is a modern system container and virtual machine manager developed and maintained by the same team that first created LXD. It’s released under the Apache 2.0 license and is run as a community led Open Source project as part of the Linux Containers organization.
Incus provides a cloud-like environment, creating instances from premade images and offers a wide variety of features, including the ability to seamlessly cluster up to 50 servers together.
It supports multiple different local or remote storage options, traditional or fully distributed networking and offers most common cloud features, including a full REST API and integrations with common tooling like Ansible, Terraform/OpenTofu and more!
The LTS release of Incus will be supported until June 2029 with the first two years featuring bug and security fixes as well as minor usability improvements before transitioning to security fixes only for the remaining 3 years.
The highlights for existing Incus users are:
Swap limits for containers
New shell completion mechanism
Creation of external bridge interfaces
Live-migration of VMs with disks attached
System information in incus info --resources
USB information in incus info --resources
For those coming from LXD 5.0 LTS, a full list of changes is included in the announcement as well as some instructions on how to migrate over.
The full announcement and changelog can be found here. And for those who prefer videos, here’s the release overview video:
And as always, my company is offering commercial support on Incus, ranging from by-the-hour support contracts to one-off services on things like initial migration from LXD, review of your deployment to squeeze the most out of Incus or even feature sponsorship. You’ll find all details of that here: https://zabbly.com/incus
Donations towards my work on this and other open source projects is also always appreciated, you can find me on Github Sponsors, Patreon and Ko-fi.
New “netplan status –diff” subcommand, finding differences between configuration and system state
As the maintainer and lead developer for Netplan, I’m proud to announce the general availability of Netplan v1.0 after more than 7 years of development efforts. Over the years, we’ve so far had about 80 individual contributors from around the globe. This includes many contributions from our Netplan core-team at Canonical, but also from other big corporations such as Microsoft or Deutsche Telekom. Those contributions, along with the many we receive from our community of individual contributors, solidify Netplan as a healthy and trusted open source project. In an effort to make Netplan even more dependable, we started shipping upstream patch releases, such as 0.106.1 and 0.107.1, which make it easier to integrate fixes into our users’ custom workflows.
With the release of version 1.0 we primarily focused on stability. However, being a major version upgrade, it allowed us to drop some long-standing legacy code from the libnetplan1 library. Removing this technical debt increases the maintainability of Netplan’s codebase going forward. The upcoming Ubuntu 24.04 LTS and Debian 13 releases will ship Netplan v1.0 to millions of users worldwide.
Highlights of version 1.0
In addition to stability and maintainability improvements, it’s worth looking at some of the new features that were included in the latest release:
Simultaneous WPA2 & WPA3 support.
Introduction of a stable libnetplan1 API.
Mellanox VF-LAG support for high performance SR-IOV networking.
New hairpin and port-mac-learning settings, useful for VXLAN tunnels with FRRouting.
New netplan status –diff subcommand, finding differences between configuration and system state.
Besides those highlights of the v1.0 release, I’d also like to shed some light on new functionality that was integrated within the past two years for those upgrading from the previous Ubuntu 22.04 LTS which used Netplan v0.104:
We added support for the management of new network interface types, such as veth, dummy, VXLAN, VRF or InfiniBand (IPoIB).
Wireless functionality was improved by integrating Netplan with NetworkManager on desktop systems, adding support for WPA3 and adding the notion of a regulatory-domain, to choose proper frequencies for specific regions.
To improve maintainability, we moved to Meson as Netplan’s buildsystem, added upstream CI coverage for multiple Linux distributions and integrations (such as Debian testing, NetworkManager, snapd or cloud-init), checks for ABI compatibility, and automatic memory leak detection.
We increased consistency between the supported backend renderers (systemd-networkd and NetworkManager), by matching physical network interfaces on permanent MAC address, when the match.macaddress setting is being used, and added new hardware offloading functionality for high performance networking, such as Single-Root IO Virtualisation virtual function link-aggregation (SR-IOV VF-LAG).
The much improved Netplan documentation, that is now hosted on “Read the Docs”, and new command line subcommands, such as netplan status, make Netplan a well vested tool for declarative network management and troubleshooting.
Integrations
Those changes pave the way to integrate Netplan in 3rd party projects, such as system installers or cloud deployment methods. By shipping the new python3-netplan Python bindings to libnetplan, it is now easier than ever to access Netplan functionality and network validation from other projects. We are proud that the Debian Cloud Team chose Netplan to be the default network management tool in their official cloud-images for Debian Bookworm and beyond. Ubuntu’s NetworkManager package now uses Netplan as it’s default backend on Ubuntu 23.10 Desktop systems and beyond. Further integrations happened with cloud-init and the Calamares installer.
This is a deeply personal post. Feel free to skip this if you’re only here for the Linux and open-source content. It’s also a touch rambling. As for the title, no, I didn’t “get” ADHD on my birthday; obviously, that’s humourous literary hyperbole. Read on.
LET age = age + 1
Like a few billion others, I managed to cling to this precious rock we call home and complete a 52nd orbit of our nearest star. What an achievement!
It’s wild for me to think it’s been that long since I innocently emerged into early 1970s Southern Britain. Back then, the UK wasn’t a member of the European Common Market and was led by a Conservative government that would go on to lose the next election.
Over in the USA, 1972 saw the beginning of the downfall of a Republican President during the Watergate Scandal.
Meanwhile, on the day I was born, Germany’s chart was led by Die Windows—How Do You Do?, which is also a song.
WHILE age <= 18
I grew up in the relatively prosperous South of England with two older siblings, parents who would eventually split, and a cat, then a dog. Life was fine, as there was food on the table, a roof over our heads, and we were all somewhat educated.
In my teenage years, I didn’t particularly enjoy school life. I mean, I enjoyed the parts where I hung out with friends and talked for hours about computers, games, and whatever else teenagers talk about. However, the actual education and part-time bullying by other pupils degraded the experience somewhat.
I didn’t excel in the British education system but scraped by. Indeed, I got a higher GCSE grade for French than English, my mother tongue. L’embarras!
My parents wanted me to go on to study A-Levels at Sixth-Form College, then on to University. I pushed back hard and unpleasantly, having not enjoyed or flourished in the UK state academic system. After many arguments, I entered the local Technical College to study for a BTEC National Diploma in Computer Studies.
This was a turning point for me. Learning to program in the late 1980s in 6502 assembler on a BBC Micro, dBase III on an IBM XT, and weirdly, COBOL on a Prime Minicomputer set me up for a career in computing.
IF income = 0 THEN GO SUB job
Over the intervening thirty years, I’ve had a dozen or so memorable jobs. Some have lasted years, others are just short contracts, taking mere months. Most have been incredibly enjoyable alongside excellent people in wonderful places. Others, less so. Pretty typical, I imagine.
During that time, it’s been clear in my head that I’m a nerd, a geek, or an enthusiast who can get deep into a subject for hours if desired. I’ve also had periods of tremendous difficulty with focus, having what feels like an endless task list, where I’d rapidly context switch and never complete anything.
The worst part is that for all that time, I thought this was just ‘me’ and these were “un-fixable” flaws in my character. Thinking back, I clearly didn’t do enough self-reflection over those thirty years.
BRIGHT 1; FLASH 1
The most mentally and emotionally challenging period of my life has been the last four years.
I consider myself a relatively empathetic and accommodating person. I have worked with, managed, and reported to non-neurotypical people in the tech space, so I had some experience.
In recent times, I have become significantly more aware and empathetic of the mental health and neurodiversity challenges others face. The onset of dementia in one family member, late diagnosis of bipolar & hypomania in another, and depression & self-harm in others, all in the space of a year, was a lot to take on and support.
After all that, something started to reveal itself more clearly.
INPUT thoughts
In my ~50 years, nobody has ever asked me, “Do you think you might be on the autistic spectrum?”. Is that something respectful strangers or loving family ask? Perhaps not.
A few years ago, at a family event, I said aloud, “You know, I feel I might be a bit ‘on the spectrum,’” which was immediately dismissed by a close family member who’d known me my entire life. “Oh”, I thought and pushed that idea to the back of my mind.
Then, in 2022, after the recent family trauma, the thoughts came back, but not enough to prompt me to get a diagnosis. I did attempt to get help through therapy and coaching. While this helped, it wasn’t enough, although it did help to nudge me in the right direction.
In 2023, I took a simple online test for ADHD & Autistic Spectrum Condition, which suggested I had some traits. I’m no expert, and I don’t believe all online medical surveys, so I made an appointment with my GP. That was exactly one year ago.
Note: I live in the UK, where the National Health Service is chronically underfunded and undervalued. The people who work for the NHS do their best, and I greatly value the services they provide.
GOTO doctor
I’m grateful to have known my Doctor for over 20 years. He’s been a thoughtful, accessible rock for our family through many medical issues. So when I arrived at my appointment and detailed the various reasons why I think I may have some kind of ADHD, it was a great comfort to hear him say, “Yes, it certainly sounds like it, given I have ADHD and do many of the same things.”
Not a diagnosis, but on that day I felt a weight had been ever so slightly lifted. I appreciate that some may feel labels aren’t necessary, but we can just get by without having to be put in little boxes. That’s fine, but I disagree. I needed this, but I didn’t know that until I heard it.
Imagine being at the bottom of a well your entire life and thinking that was how it was for everyone. Then, one day, someone lowered a bucket, and you looked up. That was how it felt for me.
Due to the interesting way healthcare works in the UK, under the NHS, and without a private healthcare plan, I was offered a number of options:
Do nothing. I seemingly made it to ~50 years old without a diagnosis. Maybe I don’t need to do anything more about this.
Pay ~£2K for an immediate private diagnosis appointment.
Go on the NHS waiting list for anything up to three years for an initial appointment with a specialist.
Get an NHS referral to a 3rd party partner healthcare provider. So-called “Right to choose”
Self-refer to a private provider on a waiting list.
I figured that while yes, I have successfully attained over 50 solar orbits, I would like some closure on the issue. It wasn’t urgent enough to pay Apple-Laptop-levels of private costs, but more urgent than “After both the next Summer and Winter Olympic games”.
I suffered quite significant anxiety over the months leading up to and after this appointment. I felt I knew inside that there was something amiss. I knew whatever it was, it was adversely affecting many parts of my life, including work. I was somewhat keen to get this resolved as soon as I could.
So, I opted for both (4) and (5) to see which one would respond first and take that option. In the end, the private provider came back with availability first - six months later, so I opted for that at my own cost. The NHS partner provider came back to me almost a year after my initial GP appointment.
PAUSE 0
The appointment came through in late December 2023. I was asked a significant number of questions during the local in-person session. We discussed a range of topics from my early school memories, to work experience in between, and right up to the present day. It took a fair while, and felt very comprehensive. More so than a 10-question online form.
At the end of the meeting, I was given the diagnosis.
Essentially, I have ADHD and probably lie somewhere on the Autistic Spectrum.
It’s possible that anyone who has known me for any length of time, either in “meatspace” or online, may well be saying, “Duh! Of course, you are.”
Sure, it may well be obvious to anyone looking down into a well that there’s someone at the bottom, but that perspective wasn’t obvious to me.
PRINT “Phew!”
This got me out of the well, but the journey wasn’t over. Nothing has inherently been solved per se by having the diagnosis, but it helps me to put some of the pieces of my life in order and understand them better.
The whole process got me thinking a lot more deeply about certain stages and experiences in my life. Since the diagnosis, I have had a significant number of “Oh, that explains that!” moments both for current behaviours and many past ones.
READ choices
At the appointment, I was presented with further choices regarding what to do next. Do I seek medication or cognitive behavioural therapy, or again, do nothing. Some people choose medication, others do not. It’s a very personal decision. Each to their own. I chose the medication route for now, but that may change based on my personal experience.
I was offered two options, Atomoxetine or Lisdexamfetamine. Check the (Wikipedia) links for details and the list of common side effects. I won’t go into that here.
I opted for Lisdexamfetamine which I’m prescribed to take each day that I “need” it. Typically, that means I only tend to take it on work days, not at weekends or during holidays. However, some people take it every day. Some take it in the morning only. While others also take some in the afternoon, once the morning dosage has “worn off”.
Unfortunately, it’s not just a case of “pop the pill and all is sorted”, obviously. Getting the dosage right has been quite a challenge. As I’m under a private consultant, and the medicine is a “Class B Controlled Drug” in the UK, I am only allowed 30-days prescription at a time.
That means I have to contact the prescribing Consultant Psychiatrist regularly to get a repeat prescription through the post. It can also be tricky finding a pharmacy that has the medicine in stock.
On one occasion I was given half the amount prescribed, along with an IOU for the remainder, to collect at a later date. On another, the pharmacy had none in stock, but ordered it for next day delivery. I heard similar horror stories from others, but consider myself lucky so far.
Further, as I’m under a private consultation, I am paying between £70 and £110 per month for the amount I’m prescribed. Once the dosage is stabilised, in theory, the prescription will instead be issued by my NHS General Practitioner, and the price to me should drop to a more palatable £9.65.
RESTORE 52
The reason I published this article on this day, my birthday (with that title) is because I think we’ve finally reached the right dosage. I am finding myself able to focus and concentrate better, I’m less “scatterbrained” in the mornings, and feel less likely to forget, misplace and “drop” things.
The last four years have been crap. They’re getting better. Starting now.
CONTINUE
This was a rather personal account of the continuing journey of me, popey. Other people make different choices, have alternate outcomes, and may not feel comfortable explaining as I have.
Equally you may find it odd that someone would write all this down, in public. It may well be. It helped me to write it, and it might help someone else to read it. If that’s not you, that’s okay too.
Finally, if you’re dealing with similar neuro-divergency traits, and are experiencing it differently from me, that’s also fine. We’re all a bit different. That’s a good thing.
STOP
Yes, I used Sinclair Spectrum (get it? - ED) commands as headings. Sorry.
Não, não é uma mentira de 1 de Abril (até porque gravámos no dia 2). A semana foi agitada, plena de arreliações e polémicas; o mundo ficou de pernas para o ar com o "backdoor" XZ; um funcionário da Microsoft salvou o Linux; a Canonical meteu ordem nos snaps de criptomoedas; o Miguel perdeu a paciência com séries do Japão Feudal que o levaram a experimentar Debian Bookworm em Raspberry pi; alguém abriu um bug no Bugzilla, o Diogo tem um brinquedo novo com botões que já está no carrinho de compras; e no meio disso tudo ainda tivemos tempo para fazer as malas a caminho da Wikicon em Évora.
Podem apoiar o podcast usando os links de afiliados do Humble Bundle, porque ao usarem esses links para fazer uma compra, uma parte do valor que pagam reverte a favor do Podcast Ubuntu Portugal.
E podem obter tudo isso com 15 dólares ou diferentes partes dependendo de pagarem 1, ou 8.
Achamos que isto vale bem mais do que 15 dólares, pelo que se puderem paguem mais um pouco mais visto que têm a opção de pagar o quanto quiserem.
Se estiverem interessados em outros bundles não listados nas notas usem o link https://www.humblebundle.com/?partner=PUP e vão estar também a apoiar-nos.
Typically you would use the incus command-line interface (CLI) client to get access to the Incus manager and perform the tasks for the full life-cycle of the virtual machines and system containers.
In this post we see how to install and setup the Incus Web UI. Just like the incus CLI tool that gets access to the REST API of the Incus manager (through a Unix socket or HTTPS), the Incus Web UI does the same over HTTPS. I assume that you have already installed and setup Incus.
The Incus Web UI package is incus-ui-canonical. We install it. By installing the package, we can enable Incus to serve the necessary Web pages (from /opt/incus/ui) so that we can connect with our browser and manage Incus itself.
debian@myincus:~$ incus config show
config: {}
debian@myincus:~$
We activate the Incus Web server, selecting the port number 8443. You are free to select another one, if you need to. We set core.https_address to :8443. This information appears in the incus config output.
debian@myincus:~$ incus config set core.https_address :8443
debian@myincus:~$ incus config show
config:
  core.https_address: :8443
debian@myincus:~$
Let’s verify that Incus is now listening to port 8443. Yes, it does. On all interfaces (because of the *).
This is HTTPS, where are the certificate and the server key (private key)?
debian@myincus:~$ sudo ls -l /var/lib/incus/server.key /var/lib/incus/server.crt
-rw-r--r-- 1 root root 753 Mar 28 18:54 /var/lib/incus/server.crt
-rw------- 1 root root 288 Mar 28 18:54 /var/lib/incus/server.key
debian@myincus:~$ sudo openssl x509 -in /var/lib/incus/server.crt -text -noout
Certificate:
    Data:
        Version: 3 (0x2)
        Serial Number:
            22:05:f1:14:f2:82:43:68:44:5e:1c:42:4c:28:5b:5c
        Signature Algorithm: ecdsa-with-SHA384
        Issuer: O = Linux Containers, CN = root@myincus
        Validity
            Not Before: Mar 28 18:54:17 2024 GMT
            Not After : Mar 26 18:54:17 2034 GMT
        Subject: O = Linux Containers, CN = root@myincus
        Subject Public Key Info:
            Public Key Algorithm: id-ecPublicKey
                Public-Key: (384 bit)
                pub:
                    04:fb:cd:b6:b2:25:55:68:a5:33:75:48:4c:b0:7a:
                    2f:e9:c0:16:af:6f:b2:36:f9:19:6e:b0:86:bf:d1:
                    9f:07:16:b1:26:8b:75:36:f2:fc:02:38:c7:fa:25:
                    39:01:6c:bb:48:a9:4f:57:0d:af:e1:0f:a3:cf:b1:
                    7c:a2:d9:46:77:e7:94:c7:00:1a:d0:5f:5f:93:d8:
                    11:39:8d:16:0e:d0:62:98:81:93:da:ec:b8:70:24:
                    f2:c4:da:91:0f:f8:8e
                ASN1 OID: secp384r1
                NIST CURVE: P-384
        X509v3 extensions:
            X509v3 Key Usage: critical
                Digital Signature, Key Encipherment
            X509v3 Extended Key Usage:
                TLS Web Server Authentication
            X509v3 Basic Constraints: critical
                CA:FALSE
            X509v3 Subject Alternative Name:
                DNS:myincus, IP Address:127.0.0.1, IP Address:0:0:0:0:0:0:0:1
    Signature Algorithm: ecdsa-with-SHA384
    Signature Value:
        30:64:02:30:15:f4:fa:7b:d6:52:79:d4:c9:27:b9:d6:6c:90:
        f7:0e:13:83:15:ac:af:cd:c5:f2:48:08:99:7f:7b:94:55:06:
        81:95:80:5f:0a:21:17:82:61:ac:5a:b6:5f:b8:49:b3:02:30:
        62:a3:92:66:da:ce:7c:01:49:7e:38:16:c6:16:b3:cb:aa:3d:
        1d:3f:63:12:93:e8:a1:0b:55:f0:80:99:d5:80:8a:a3:a6:2e:
        3d:68:90:a6:dc:55:29:0b:36:80:36:72

debian@myincus:~$
Note that this is a self-signed certificate. Chrome, Firefox and other browsers will complain; you can still accept to continue but it will show a broken padlock at the address bar. If you wish, you can replace these with proper certificates so that the padlock is intact. To do so, once you replace the server key and the server certificate with actual values, restart Incus. If, however, you are running an Incus cluster, you must use lxc cluster update-certificate instead to update them. Note that a common alternative to dealing with Incus certificates, is to use a reverse-proxy; you get the reverse-proxy to use a proper certificate and leave Incus as is.
At this point Incus is configured. We can continue with the next step where we get the client (our browser) to be authenticated to the server.
Getting the browser to authenticate to the server
Visit the URL of your Incus server with your browser. At first you will likely confronted with a message that the server certificate is not accepted (Warning: Potential Security Risk Ahead). Click to Accept and continue. Then, you are presented with the following screen that asks you to login. You are authenticated to the Incus server through user certificates. You are prompted here to do just that. Your browser will create
a user certificate to be installed into Incus (incus-ui.crt)
the same user certificate with a private key that will be setup in your browser(s) (incus-ui.pfx).
Click on Create a new certificate.
Creating a new certificate.
Now click on Generate to get your browser to generate the private key and the certificate.
You are asked whether you want to protect the certificate with a password. In our case we click on Skip because we do not want to encrypt the private key with a password. By clicking on Skip, the private key is still generated but it is not getting encrypted.
At this point the browser generated incus-ui.crt, which is the user certificate to install in Incus. In the following we added the user certificate to Incus.
debian@myincus:~$ incus config trust list
+------+------+-------------+-------------+-------------+
| NAME | TYPE | DESCRIPTION | FINGERPRINT | EXPIRY DATE |
+------+------+-------------+-------------+-------------+
debian@myincus:~$ incus config trust add-certificate incus-ui.crt
debian@myincus:~$ incus config trust list
+--------------+--------+-------------+--------------+----------------------+
|     NAME     |  TYPE  | DESCRIPTION | FINGERPRINT  |     EXPIRY DATE      |
+--------------+--------+-------------+--------------+----------------------+
| incus-ui.crt | client |             | b89b80eb4c89 | 2026/12/23 21:08 UTC |
+--------------+--------+-------------+--------------+----------------------+
debian@myincus:~$
The two files have been generated. We are adding incus-ui.crt to Incus, and incus-ui.pfx to the Web browser.
The page above has instructions on how to add the user certificate to Firefox, Chrome, Edge and macOS. For example, for the case of Firefox, type the following to the address bar and press Enter. Alternatively, go to Settings→Privacy & Security→Certificates. There, click on View Certificates… and select the Your Certificates tab. Finally, click to Import… the incus-ui.pfx certificate file.
about:preferences#privacy
This is found in Firefox under Settings→Privacy & Security→Certificates.
When you add the incus-ui.pfx user certificate in Firefox, it will appear as in the following screenshot.
The incus-ui.pfx certificate has been added to this instance of Firefox.
Subsequently, switch back to the Firefox tab with the Incus UI page and you are shown the following prompt to get your browser to send the user certificate to the Incus manager in order to get authenticated, and be able to manage Incus through the Web. Click on OK.
You are prompted to identify yourself to Incus UI in order to be able to manage the Incus installation.
Finally, you are able to manage Incus over the Web with Incus UI. The Web page loads up and you can perform all tasks that you can do with the incus command-line client.
Your browser is now authenticated through your user certificate and you can manage Incus over the Web with Incus UI.
Using the Incus UI
We click on Create Instance to create a first instance. We select from the list which image to use, then click to Create and start.
Creating an instance and starting it.
While the instance is created, you are updated with the different steps that take place. In the end, the instance is successfully launched.
The instance has been created and is running.
Conclusion
With Incus UI you are able to go through all the workflow of managing Incus instances through your Web browser. Incus UI has been implemented as a stateless Web application, which means that no information are stored on the browser. For example, the browser does not maintain a database with the created instances; the state is maintained on Incus.
There are a few more UI Web applications for Incus, including lxops. At some point in the future I expect to cover them as well.
Tips and Tricks
How to make the Incus port accessible to localhost only
The address has the format of <ip address>:<port>. You can specify localhost (127.0.0.1) for the part of the IP address. By doing so, Incus will only bind to localhost and listen to local connections only.
debian@myincus:~$ incus config show
config:
  core.https_address: :8443
debian@myincus:~$ incus config set core.https_address 127.0.0.1:8443
debian@myincus:~$ incus config show
config:
  core.https_address: 127.0.0.1:8443
debian@myincus:~$ sudo lsof -i :8443
COMMAND  PID USER   FD   TYPE DEVICE SIZE/OFF NODE NAME
incusd  8338 root    8u  IPv4  30315      0t0  TCP localhost:8443 (LISTEN)
debian@myincus:~$
What’s in incus-ui.crt and incus-ui.pfx?
You can use openssl to decode both files. This is an RSA 2048-bit certificate using the SHA-1 hash function.
$ openssl x509 -in incus-ui.crt -noout -text
Certificate:
    Data:
        Version: 3 (0x2)
        Serial Number:
            01:12:00:11:07:65:00:03:00:10:00:41:00:04:09:11
        Signature Algorithm: sha1WithRSAEncryption
        Issuer: C = AU, ST = Some-State, O = Incus UI 10.10.10.98 (Browser Generated)
        Validity
            Not Before: Mar 28 21:08:58 2024 GMT
            Not After : Dec 23 21:08:58 2026 GMT
        Subject: C = AU, ST = Some-State, O = Incus UI 10.10.10.98 (Browser Generated)
        Subject Public Key Info:
            Public Key Algorithm: rsaEncryption
                Public-Key: (2048 bit)
                Modulus:
                    00:ce:f8:1d:67:e1:a3:f5:1a:16:b6:26:63:8f:32:
                    42:99:0d:af:86:8b:18:49:1a:4b:8e:ab:68:e1:04:
                    ba:24:dd:e6:27:d5:df:7a:13:cf:16:b3:33:28:89:
                    e0:ab:c8:dc:c1:2a:0a:de:ed:26:3a:77:74:dd:42:
                    1c:e2:22:fc:a5:a5:68:c1:c9:3b:4d:12:15:27:ae:
                    c6:50:ec:dc:f1:0a:ba:00:0c:83:d0:0d:0f:81:90:
                    4e:30:43:cb:45:bf:e2:e9:17:39:40:3b:95:8b:8b:
                    18:e9:59:51:fc:9a:7a:80:e4:73:b3:54:bd:ff:1c:
                    7c:81:75:16:e3:6f:3a:56:9b:0f:a3:73:55:45:03:
                    d8:fb:f3:34:4c:60:4f:f2:67:9f:66:ea:29:29:78:
                    6c:66:05:d6:7d:96:cd:0f:2b:4b:9c:71:2c:09:6f:
                    e2:b4:23:d0:5d:d0:fe:b0:6a:b1:58:5e:d7:b5:47:
                    9e:aa:47:34:f8:7d:e1:ed:fe:bf:97:3d:99:49:42:
                    af:e2:e5:b3:c5:1e:58:b1:98:01:db:8f:25:9f:f8:
                    d9:03:02:06:f9:99:0a:3a:a1:70:9d:fe:64:0d:c2:
                    d8:cc:f0:1c:53:e4:31:4c:78:12:c2:fd:72:23:6a:
                    f4:7e:41:f9:d5:df:6b:ad:2c:52:29:d0:7f:eb:65:
                    64:0f
                Exponent: 65537 (0x10001)
    Signature Algorithm: sha1WithRSAEncryption
    Signature Value:
        28:b3:5c:48:64:8c:23:82:dd:e2:05:6a:9d:18:dd:43:f4:07:
        e6:be:1e:80:b7:f9:0c:0f:3d:cd:b8:bd:7b:55:7e:36:6d:74:
        24:d5:69:b2:24:51:3a:2d:c5:95:68:b5:dc:27:d5:83:d9:bc:
        cb:d0:fd:55:24:63:7d:c6:65:9b:f1:b3:9d:f7:b4:4e:ba:83:
        eb:bf:f5:d0:f6:95:2d:7b:90:4e:d3:89:ac:f0:87:e6:fa:9d:
        f6:ea:c2:42:f2:15:17:74:5c:e4:3c:ed:1a:42:3c:e7:04:aa:
        65:42:3e:75:5c:24:8e:52:85:0d:4b:b2:e2:ec:fa:57:4a:68:
        35:4b:8f:3c:13:fc:15:09:80:5a:b1:c8:e0:22:f5:69:25:4b:
        46:8b:e0:b9:e1:3a:f5:0c:40:d2:c3:75:9c:79:9a:aa:68:9b:
        21:36:ed:67:cb:6d:fc:bc:f0:0b:5a:2b:1a:4c:73:67:c5:79:
        b6:27:b9:58:d0:c7:ea:84:21:bf:f4:7c:44:11:d7:88:ab:1d:
        e4:53:c9:10:cd:e6:b8:5a:7a:92:73:a8:1e:fe:1c:2e:dc:e8:
        7e:3d:e9:a2:6d:26:5a:09:40:a1:3e:51:40:8b:da:57:37:9a:
        8d:0e:d8:cf:c1:0a:b1:0b:95:53:05:41:29:39:af:93:9b:aa:
        10:af:a1:6c
$
For the incus-ui.pfx file, we first convert to the PEM format, then print the contents. The PFX file contains the certificate (the same that was added earlier to Incus) along with the private key.
You tried to access the IP address of the Incus server as (for example) https://192.168.1.10/ while you should have specified the IP address as well. The URL should look like https://192.168.1.10:8443/.
Error: Client sent an HTTP request to an HTTPS server
You tried to connect to the Incus server at an address (for example) http://192.168.1.10:8443/ but you omitted the s in https. Use https://192.168.1.10:8443/ instead.
Warning: Potential Security Risk Ahead
You are accessing the Incus server through the HTTPS address for the first time and the certificate has not been signed by a certification authority.
First attempt to access the Incus server over HTTPS with your browser.
Click on Advanced and select to Accept the risk and Continue. If you want to avoid this error message, you need to provide a server certificate that is accepted by your browser.
As many of you know, I lost my beloved son March 9th. This has hit me really hard, but I am staying strong and holding on to all the wonderful memories I have. He grew up to be an amazing man, devoted christian and wonderful father. He was loved by everyone who knew him and will be truly missed by us all. I have had folks ask me how they can help. He left behind his 7 year old son Mason. Mason was Billy’s world and I would like to make sure Mason is taken care of. I have set up a gofundme for Mason and all proceeds will go to the future care of him.
You will see the activity in this ramp back up as the KDEneon Core project is finally a go! I will participate in the project with part time status and get everyone in the Enokia team up to speed with my snap knowledge, help prepare the qt6/kf6 transition, package plasma, and most importantly I will focus on documentation for future contributors.
I have created the ( now split ) qt6 with KDE patchset support and KDE frameworks 6 SDK and runtime snaps. I have made the kde-neon-6 extension and the PR is in: https://github.com/canonical/snapcraft/pull/4698 . Future work on the extension will include multiple versions track support and core24 support.
I have successfully created our first qt6/kf6 snap ark. They will show showing up in the store once all the required bits have been merged and published.
A virtual machine (VM) is an instance of an operating system that runs on a computer, along with the main operating system. A virtual machine uses hardware virtualization features for the separation from the main operating system. With virtual machines, the full operating system boots up in them.
A system container is an instance of an operating system that also runs on a computer, along with the main operating system. A system container, instead, uses security primitives of the Linux kernel for the separation from the main operating system. You can think of system containers as software virtual machines. System containers reuse the running Linux kernel of the host, therefore you can only have Linux system containers, any Linux distribution.
In this post we see how to create a VM with Incus, install Incus into that VM, and then create a VM through the inner Incus installation. This is also called nested virtualization. Incus works fine with nested virtualization. Any pitfalls arise from the settings of the host (BIOS/UEFI settings, host Linux kernel, etc). We’ll see these together, step by step.
You would need to enter into the BIOS/UEFI settings and enable the option for VT-x (for Intel CPUs) or AMD-V (for AMD CPUs) virtualization. If you are unsure, you can just follow the instructions in the next step which will complain if you have not enabled the appropriate BIOS/UEFI settings.
As a sidenote there is another setting, Intel VT-d (for Intel CPUs) or AMD-Vi (for AMD CPUs) that allow to move a supported hardware device (like a GPU, if you have more than one) into the VM. Not essential for what we are testing, but keep that in mind if you get too deep into virtualization.
There are also some additional options that are optional, AMD Nested Page tables (NPT) (for AMD) and Rapid Virtualization Indexing (RVI)/Intel Extended Page Tables (EPT) for Intel. These help for performance.
Testing your host for virtualization
The Linux kernel that is available in most Linux distributions supports the KVM hypervisor for virtualization.
Applications use the libvirttoolkit to access the virtualization features.
In order to test if our host supports virtualization, we install cpu-checker and the libvirt-clients packages on the host and then run kvm-ok and virt-host-validate respectively to verify our system. Compared between the two utilities, the latter is better. However, I am including cpu-checkeras it is covered in lots of documentation.
$ sudo apt install -y cpu-checker libvirt-clients
...
$ kvm-ok
INFO: /dev/kvm exists
KVM acceleration can be used
$ sudo virt-host-validate
  QEMU: Checking for hardware virtualization                                 : PASS
  QEMU: Checking if device /dev/kvm exists                                   : PASS
  QEMU: Checking if device /dev/kvm is accessible                            : PASS
  QEMU: Checking if device /dev/vhost-net exists                             : PASS
  QEMU: Checking if device /dev/net/tun exists                               : PASS
  QEMU: Checking for cgroup 'cpu' controller support                         : PASS
  QEMU: Checking for cgroup 'cpuacct' controller support                     : PASS
  QEMU: Checking for cgroup 'cpuset' controller support                      : PASS
  QEMU: Checking for cgroup 'memory' controller support                      : PASS
  QEMU: Checking for cgroup 'devices' controller support                     : PASS
  QEMU: Checking for cgroup 'blkio' controller support                       : PASS
  QEMU: Checking for device assignment IOMMU support                         : PASS
  QEMU: Checking if IOMMU is enabled by kernel                               : PASS
  QEMU: Checking for secure guest support                                    : WARN (Unknown if this platform has Secure Guest support)
   LXC: Checking for Linux >= 2.6.26                                         : PASS
   LXC: Checking for namespace ipc                                           : PASS
   LXC: Checking for namespace mnt                                           : PASS
   LXC: Checking for namespace pid                                           : PASS
   LXC: Checking for namespace uts                                           : PASS
   LXC: Checking for namespace net                                           : PASS
   LXC: Checking for namespace user                                          : PASS
   LXC: Checking for cgroup 'cpu' controller support                         : PASS
   LXC: Checking for cgroup 'cpuacct' controller support                     : PASS
   LXC: Checking for cgroup 'cpuset' controller support                      : PASS
   LXC: Checking for cgroup 'memory' controller support                      : PASS
   LXC: Checking for cgroup 'devices' controller support                     : PASS
   LXC: Checking for cgroup 'freezer' controller support                     : FAIL (Enable 'freezer' in kernel Kconfig file or mount/enable cgroup controller in your system)
   LXC: Checking for cgroup 'blkio' controller support                       : PASS
   LXC: Checking if device /sys/fs/fuse/connections exists                   : PASS
$
If you get a failure, try to identify whether the issue is with your computer’s firmware or with the Linux kernel of your host. If in doubt, post below the output.
Why does the output mention both QEMU and LXC? By default, the command shows all libvirt virtualization support, unless you specify something specific. If you wanted only the QEMU output, you would run sudo virt-host-validate qemu. Note that the LXC here is not the Linux Containers LXC. The LXC above is the Libvirt LXC.
Testing your host for nested virtualization
I have not noticed any mention for nested virtualization in the output of virt-host-validate. If you know a tool that shows that information, write it in the comments. In the absence of such a tool, let’s check manually.
If you have an AMD CPU, run the following. If you get 1, then nested virtualization through KVM works.
$ cat /sys/module/kvm_amd/parameters/nested
1
$
If instead you have an Intel CPU, run the following. If you get Y(instead of 1), then nested virtualization through KVM works.
$ cat /sys/module/kvm_intel/parameters/nested
Y
$
If instead you get an error (such as the following), then something is wrong. Report back your CPU model and motherboard, along with the Linux kernel version and Linux distribution.
cat: /sys/module/kvm_intel/parameters/nested: No such file or directory
Launching the outer Incus VM
We launch the outer VM. Get a shell into the outer VM, install Incus and those utilities that show whether KVM virtualization works. Then, we launch an Alpine VM in the outer VM. We get an error regarding Secure Boot (the Alpine Linux kernel is not signed), remove the stuck VM and launch again with Secure Boot disabled. Finally, we get a shell into the inner VM.
$ incus launch images:debian/12 outervm --vm
Launching outervm
$ incus shell outervm
root@outervm:~#

      # Install Incus according to the documentation.

root@outervm:~# sudo apt install -y cpu-checker libvirt-clients
...
root@outervm:~# virt-host-validate
  QEMU: Checking for hardware virtualization                                 : PASS
  QEMU: Checking if device /dev/kvm exists                                   : PASS
  QEMU: Checking if device /dev/kvm is accessible                            : PASS
  QEMU: Checking if device /dev/vhost-net exists                             : PASS
  QEMU: Checking if device /dev/net/tun exists                               : PASS
...
root@outervm:~# incus launch images:alpine/edge innervm --vm
Launching innervm
Error: Failed instance creation: The image used by this instance is incompatible with secureboot. Please set security.secureboot=false on the instance
root@outervm:~# incus delete innervm
root@outervm:~# incus launch images:alpine/edge innervm --vm --config security.secureboot=false
Launching innervm
root@outervm:~# incus list -c ns4t
+---------+---------+-----------------------+-----------------+
|  NAME   |  STATE  |         IPV4          |      TYPE       |
+---------+---------+-----------------------+-----------------+
| innervm | RUNNING | 10.227.169.165 (eth0) | VIRTUAL-MACHINE |
+---------+---------+-----------------------+-----------------+
root@outervm:~# uname -a
Linux outervm 6.1.0-18-amd64 #1 SMP PREEMPT_DYNAMIC Debian 6.1.76-1 (2024-02-01) x86_64 GNU/Linux
root@outervm:~# incus shell innervm
innervm:~# uname -a
Linux innervm 6.6.22-1-virt #2-Alpine SMP PREEMPT_DYNAMIC Thu, 14 Mar 2024 02:12:52 +0000 x86_64 Linux
innervm:~#
Conclusion
We saw how to verify whether our host is able to work with hardware virtualization. This involves checking both the computer firmware settings (BIOS/UEFI) and the host Linux kernel.
Then, we created an outer VM with Incus, got a shell into there, installed Incus, and launched an inner (nested) VM.
I wonder whether we can go further and create a VM inside the inner VM. If you go through these and try to create an inner inner VM, post the error message. It does not feel like it should be possible.
The last Incus release before we go LTS has now been released!
This is quite the feature packed release as this is meant to include just about every features we want in Incus 6.0 LTS except for a few last minute minor additions.
You’ll find new features for just about everyone, from multi-cluster networking with the new network integrations, to enhanced performance on multi-socket servers with the improved NUMA support, to easier authentication with JSON Web Token support, to I/O limits for virtual machines and more USB passthrough options.
The full announcement and changelog can be found here. And for those who prefer videos, here’s the release overview video:
And as always, my company is offering commercial support on Incus, ranging from by-the-hour support contracts to one-off services on things like initial migration from LXD, review of your deployment to squeeze the most out of Incus or even feature sponsorship. You’ll find all details of that here: https://zabbly.com/incus
Donations towards my work on this and other open source projects is also always appreciated, you can find me on Github Sponsors, Patreon and Ko-fi.
I’ve recently switched back from vscode to Sublime Text, which means that after all the time I spent training my fingers to type “code somefile.txt” instead of “subl somefile.txt” I now need to undo all that conditioning and go back to subl again. So I thought, hey, maybe I should dump a little shell script called code in my bin folder which admonished me in some amusing way, thus Pavlov-ing myself into learning to do it right.
And then I thought, hey, what’d be cool is if I had that Matrix-esque “raining code” effect in the Terminal and then it was superimposed with a box saying “STOPTYPING code ANDUSE subl INSTEAD”, like the “SYSTEMERROR” message at the end of the first movie.
And then I thought: someone’s already done this, right? And they have; it is called cmatrix. But I don’t like cmatrix because it doesn’t do the colours right; the text just sorta stops rather than fading away like the movie does, and it feels unreal and too sharp for me. Now, don’t get me wrong, I understand why this is; terminals support a full proper range of colour these days, but writing a program which gets released to actual people and which can deal with the bewildering array of terminal settings out there is a miserable waste of everyone’s time. But I’m not writing this for anyone else; it only has to work in my terminal (in true works on my machine fashion). And this will give me a chance to noodle about with Python terminal libraries such as blessed to make something interesting. Hence, matrix24.py:
It’s a bodge all round, and it still doesn’t look right, and Jess pointed out that making something cool happen when I make a mistake is the opposite of conditioning, but I got to fiddle about with a new library for a bit, so that was fun. Can I do something productive now?
(title from a classic post about the Matrix which still makes me laugh even after all these years, although it is very unfair to Keanu Reeves who is a cool bloke and should be emulated in his approach to life)
Multipass is pretty useful but what a pain this was to figure out, due to Ubuntu’s Node.js package not working with AWS-CDK.
Multipass lets you manage VM in Ubuntu and can take cloud-init scripts as a parameter. I wanted an Ubuntu LTS instance with AWS CDK, which needs Node.js and python3-venv.
As 24.04 LTS will represent the eighth Long-Term Support release of Ubuntu Studio and its 32nd release. For this release, we wanted to make sure we got some great representation from the community in terms of wallpaper, and while there weren’t as many entries as our previous competition, we were blown out of the way in terms of quality. While not every wallpaper could be included, all of the entries were solid, and narrowing it down to the best of the best was very difficult.
Revealing The Default
Our long-time art lead, Eylul Dogruel, worked diligently on making a quality textured default wallpaper that not only works well for traditional horizontal screens, but for vertical screens as well without losing quality. We have two variations: one with our logo, and one with the mascot that will be rotated-out for the next four releases.
Now to Crown the Winners!
As stated, this was a very difficult decision, but we would like to congratulate the winners of the competition! The full-quality images will be included in Ubuntu Studio 24.04 LTS and are already in our daily builds of Noble Numbat.
On Mastodon, the
question came up of
how Ubuntu would deal with something like the npm install
everything situation. I replied:
Ubuntu is curated, so it probably wouldn’t get this far. If it did, then
the worst case is that it would get in the way of CI allowing other
packages to be removed (again from a curated system, so people are used to
removal not being self-service); but the release team would have no
hesitation in removing a package like this to fix that, and it certainly
wouldn’t cause this amount of angst.
If you did this in a PPA, then
I can’t think of any particular negative effects.
OK, if you added lots of build-dependencies (as well as run-time
dependencies) then you might be able to take out a builder. But Launchpad
builders already run arbitrary user-submitted code by design and are
therefore very carefully sandboxed and treated as ephemeral, so this is
hardly novel.
There’s a lot to be said for the arrangement of having a curated system for
the stuff people actually care about plus an ecosystem of add-on
repositories. PPAs cover a wide range of levels of developer activity, from
throwaway experiments to quasi-official distribution methods; there are
certainly problems that arise from it being difficult to tell the difference
between those extremes and from there being no systematic confinement, but
for this particular kind of problem they’re very nearly ideal. (Canonical
has tried various other approaches to software distribution, and while they
address some of the problems, they aren’t obviously
better at helping
people make reliable social judgements about code they don’t know.)
For a hypothetical package with a huge number of dependencies, to even try
to upload it directly to Ubuntu you’d need to be an Ubuntu developer with
upload rights (or to go via Debian, where you’d have to clear a similar
hurdle). If you have those, then the first upload has to pass manual review
by an archive administrator. If your package passes that, then it still has
to build and get through
proposed-migrationCI before it
reaches anything that humans typically care about.
On the other hand, if you were inclined to try this sort of experiment,
you’d almost certainly try it in a PPA, and that would trouble nobody but yourself.
Launchpad has been around for a while, and its frontpage has remained untouched for a few years now.
If you go into launchpad.net, you’ll notice it looks quite different from what it has looked like for the past 10 years – it has been updated! The goal was to modernize it while trying to keep it looking like Launchpad. The contents have remained the same with only a few text additions, but there were a lot of styling changes.
The most relevant change is that the frontpage now uses Vanilla components (https://vanillaframework.io/docs). This alone, not only made the layout look more modern, but also made it better for a new curious user reaching the page from a mobile device. The accessibility score of the page – calculated with Google’s Lighthouse extension – increased from a 75 to an almost perfect 98!
Given the frontpage is so often the first impression users get when they want to check out Launchpad, we started there. But in the future, we envision the rest of Launchpad looking more modern and having a more intuitive UX.
As a final note, thank you to Peter Makowski for always giving a helping hand with frontend changes in Launchpad.
Plasma Pass is a Plasma applet for the Pass password manager
This release includes build fixes for Plasma 6, due to be released later this week.
URL: https://download.kde.org/stable/plasma-pass/ Sha256: 2a726455084d7806fe78bc8aa6222a44f328b6063479f8b7afc3692e18c397ce Signed by E0A3EB202F8E57528E13E72FD7574483BB57B18D Jonathan Esk-Riddell <jr@jriddell.org> https://jriddell.org/esk-riddell.gpg
Thanks to all the hard work from our contributors, Lubuntu 22.04.4 LTS has been released. With the codename Jammy Jellyfish, Lubuntu 22.04 is the 22nd release of Lubuntu, the eighth release of Lubuntu with LXQt as the default desktop environment. Support lifespan Lubuntu 22.04 LTS will be supported for 3 years until April 2025. Our […]
We are pleased to announce the release of the next version of our distro, the fourth 22.04 LTS point release. The LTS version is supported for 3 years while the regular releases are supported for 9 months. The new release rolls-up various fixes and optimizations by Ubuntu Budgie team, that have been released since the 22.04.3 release in August: For the adventurous among our community we…
Oxygen Icons is an icon theme for use with any XDG compliant app and desktop.
It is part of KDE Frameworks 6 but is now released independently to save on resources.
This 6.0.0 release requires to be built with extra-cmake-modules from KF 6 which is not yet released, distros may want to wait until next week before building it.
Distros which ship this version can drop the version released as part of KDE Frameworks 5.
There’s a YouTube channel called
Clickspring,
run by an Australian bloke called Chris
who is a machinist: a mechanical engineer
with a lathe and a mill and all manner of
little tools. I am not a machinist — at
school I was fairly inept at what we
called CDT, for Craft Design and
Technology, and what Americans much more
prosaically call “shop class”. My dad was,
though, or an engineer at least. Although
Chris builds clocks and beautiful brass
mechanisms, and my dad built aeroplanes.
Heavy engineering. All my engineering is
software, which actual engineers don’t
think is engineering at all, and most of
the time I don’t either.
You can
romanticise it: claim that software
development isn’t craft, it’s art. And
there is a measure of truth in this. It’s
like writing, which is the other thing I
spend a lot of time doing for money;
that’s an art, too.
If you’re doing it
right, at least.
Most of the writing
that’s done, though, isn’t art. And most
of the software development isn’t, either.
Or most of the engineering. For every one
person creating beauty in prose or code or
steel, there are fifty just there doing
the job with no emotional investment in
what they’re doing at all. Honestly,
that’s probably a good thing, and not a
complaint. While I might like the
theoretical idea of a world where
everything is hand made by someone who
cares, I don’t think that you should have
to care in order to get paid. The people
who are paying you don’t care, so you
shouldn’t have to either.
It’s nice if you
can swing it so you get both, though.
The
problem is that it’s not possible to
instruct someone to give a damn. You can’t
regulate the UK government into giving a
damn about people who fled a war to come
here to find their dream of being a nurse,
you can’t regulate Apple bosses into
giving a damn about the open web, you
can’t regulate CEOs into giving a damn
about their employees or governments about
their citizens or landlords about their
tenants. That’s not what regulation is
for; people who give a damn largely don’t
need regulation because they want to do
the right thing. They might need a little
steering into knowing what the right thing
is, but that’s not the same.
No,
regulation is there as a reluctant
compromise: since you can’t make people
care, the best you can do is in some rough
and ready fashion make them behave in a
similar way to the way they would if they
did. Of course, this is why the most
insidious kind of response is not an
attempt to evade responsibility but an attack on
the system of regulation itself. Call
judges saboteurs or protesters criminals
or insurgents patriots. And why the most
heinous betrayal is one done in the name
of the very thing you’re destroying. Claim
to represent the will of the people while
hurting those people. Claim to be
defending the law while hiding violence
and murder behind a badge. Claim privacy
as a shield for surveillance or for
exclusion. We all sorta
thought
that the system could protect us, that
those with the power could be trusted to
use it at least a little responsibly. And
the last year has been one more in a
succession of years demonstrating just how
wrong that is. This and no other is the
root from which a tyrant springs; when he
first appears he is a protector.
The worst
thing about it is that the urge to protect
other people is not only real but the best
thing about ourselves. When it’s actually
real. Look after others, especially those
who need it, and look after yourself,
because you’re one of the people who needs it.
Chris from Clickspring polishes things
to a high shine using tin, which surprised
me. I thought bringing out the beauty in
something needed a soft cloth but no, it’s
done with metal. Some things, like silver,
are basically shiny with almost no effort;
there’s a reason people have prized silver
things since before we could even write
down why, and it’s not just because you
could find lumps of it lying around the
place with no need to build a smelting
furnace. Silver looks good, and makes you
look good in turn. Tin is useful, and it
helps polish other things to a high shine.
Today’s my 48th
birthday.
A highly composite number. The ways Torah
wisdom is acquired. And somewhere between
silver and tin. That sounds OK to me.
Linux kernel getting a livepatch whilst running a marathon. Generated with AI.
Livepatch service eliminates the need for unplanned maintenance windows for high and critical severity kernel vulnerabilities by patching the Linux kernel while the system runs. Originally the service launched in 2016 with just a single kernel flavour supported.
Over the years, additional kernels were added: new LTS releases, ESM kernels, Public Cloud kernels, and most recently HWE kernels too.
Recently livepatch support was expanded for FIPS compliant kernels, Public cloud FIPS compliant kernels, and as well IBM Z (mainframe) kernels. Bringing the total of kernel flavours support to over 60 distinct kernel flavours supported in parallel. The table of supported kernels in the documentation lists the supported kernel flavours ABIs, the duration of individual build's support window, supported architectures, and the Ubuntu release. This work was only possible thanks to the collaboration with the Ubuntu Certified Public Cloud team, engineers at IBM for IBM Z (s390x) support, Ubuntu Pro team, Livepatch server & client teams.
It is a great milestone, and I personally enjoy seeing the non-intrusive popup on my Ubuntu Desktop that a kernel livepatch was applied to my running system. I do enable Ubuntu Pro on my personal laptop thanks to the free Ubuntu Pro subscription for individuals.
What's next? The next frontier is supporting ARM64 kernels. The Canonical kernel team has completed the gap analysis to start supporting Livepatch Service for ARM64. Upstream Linux requires development work on the consistency model to fully support livepatch on ARM64 processors. Livepatch code changes are applied on a per-task basis, when the task is deemed safe to switch over. This safety check depends mostly on kernel stacktraces. For these checks, CONFIG_HAVE_RELIABLE_STACKTRACE needs to be available in the upstream ARM64 kernel. (see The Linux Kernel Documentation). There are preliminary patches that enable reliable stacktraces on ARM64, however these turned out to be problematic as there are lots of fix revisions that came after the initial patchset that AWS ships with 5.10. This is a call for help from any interested parties. If you have engineering resources and are interested in bringing Livepatch Service to your ARM64 platforms, please reach out to the Canonical Kernel team on the public Ubuntu Matrix, Discourse, and mailing list. If you want to chat in person, see you at FOSDEM next weekend.
Now, while hunting for bsc#1219073 which is quite sporadic, and took quite some time to show up often enough so that
became noticeable and traceable, once stars aligned and managed to find a way to get a higher failure rate,
I wanted to have a way for me and for the developer to test the kernel with the different patches to help with the bisecting
and ease the process of finding the culprit and finding a solution for it.
I came with a fairly simple solution, using the --repeat parameter of the openqa-cli tool, and a simple shell script to run it:
```bash
$ cat ~/Downloads/trigger-kernel-openqa-mdadm.sh
# the kernel repo must be the one without https; tests don't have the kernel CA installedKERNEL="KOTD_REPO=http://download.opensuse.org/repositories/Kernel:/linux-next/standard/"REPEAT="--repeat 100"# using 100 by defaultJOBS="https://openqa.your.instan.ce/tests/13311283 https://openqa.your.instan.ce/tests/13311263 https://openqa.your.instan.ce/tests/13311276 https://openqa.your.instan.ce/tests/13311278"BUILD="bsc1219073"for JOB in$JOBS;do
openqa-clone-job --within-instance$JOBCASEDIR=https://github.com/foursixnine/os-autoinst-distri-opensuse.git#tellmewhy ${REPEAT}\_GROUP=DEVELOPERS ${KERNEL}BUILD=${BUILD}FORCE_SERIAL_TERMINAL=1\TEST="${BUILD}_checkmdadm"YAML_SCHEDULE=schedule/qam/QR/15-SP5/textmode/textmode-skip-registration-extra.yaml INSTALLONLY=0 DESKTOP=textmode\
|& tee jobs-launched.list;done;
There are few things to note here:
the kernel repo must be the one without https; tests don’t have the CA installed by default.
the --repeat parameter is set to 100 by default, but can be changed to whatever number is desired.
the JOBS variable contains the list of jobs to clone and run, having all supported architecures is recommended (at least for this case)
the BUILD variable can be anything, but it’s recommended to use the bug number or something that makes sense.
the TEST variable is used to set the name of the test as it will show in the test overview page, you can use TEST+=foo if you want to append text instead of overriding it, the --repeat parameter, will append a number incrementally to your test, see os-autoinst/openQA#5331 for more details.
the YAML_SCHEDULE variable is used to set the yaml schedule to use, there are other ways to modify the schedule, but in this case I want to perform a full installation
Running the script
Ensure you can run at least the openQA client; if you need API keys, see post linked at the beginning of this post
replace the kernel repo with your branch in line 5
run the script $ bash trigger-kernel-openqa-mdadm.sh and you should get the following, times the --repeat if you modified it
1 job has been created:
 - sle-15-SP5-Full-QR-x86_64-Build134.5-skip_registration+workaround_modules@64bit -> https://openqa.your.instan.ce/tests/13345270
Each URL, will be a job triggered in openQA, depending on the load and amount of jobs, you might need to wait quite a bit (some users can help moving the priority of these jobs so it executes faster)
The review stuff:
Looking at the results
Go to https://openqa.your.instan.ce/tests/overview?distri=sle&build=bsc1219073&version=15-SP5 or from any job from the list above click on Job groups menu at the top, and select Build bsc1219073
Click on “Filter”
type the name of the test module to filter in the field Module name, e.g mdadm, and select the desired result of such test module e.g failed (you can also type, and select multiple result types)
Click Apply
The overall summary of the build overview page, will provide you with enough information to calculate the pass/fail rate.
A rule of thumb: anything above 5% is bad, but you need to also understand your sample size + the setup you’re using; YMMV.
Ain’t nobody got time to wait
The script will generate a file called: jobs-launched.list, in case you absolutely need to change the priority of the jobs, set it to 45, so it runs higher than default priority, which is 50
cat jobs-launched.list | grep https | sed -E 's/^.*->\s.*tests\///' | xargs -r -I {} bash -c "openqa-cli api --osd -X POST jobs/{}/prio prio=45; sleep 1"
The magic
The actual magic is in the schedule, so right after booting the system and setting it up, before running the mdadm test, I inserted the update_kernel module, which will add the kernel repo specified by KOTD_REPO, and install the kernel from there, reboot the system, and leave the system ready for the actual test,
however I had to add very small changes:
---
 tests/kernel/update_kernel.pm | 4 ++--
 1 file changed, 2 insertions(+), 2 deletions(-)

diff --git a/tests/kernel/update_kernel.pm b/tests/kernel/update_kernel.pm
index 1d6312bee0dc..048da593f68f 100644
--- a/tests/kernel/update_kernel.pm
+++ b/tests/kernel/update_kernel.pm
@@ -398,7 +398,7 @@ sub boot_to_console {
 sub run {
     my $self = shift;

-    if ((is_ipmi && get_var('LTP_BAREMETAL')) || is_transactional) {
+    if ((is_ipmi && get_var('LTP_BAREMETAL')) || is_transactional || get_var('FORCE_SERIAL_TERMINAL')) {
         # System is already booted after installation, just switch terminal
         select_serial_terminal;
     } else {
@@ -476,7 +476,7 @@ sub run {
         reboot_on_changes;
     } elsif (!get_var('KGRAFT')) {
         power_action('reboot', textmode => 1);
-        $self->wait_boot if get_var('LTP_BAREMETAL');
+        $self->wait_boot if (get_var('FORCE_SERIAL_TERMINAL') || get_var('LTP_BAREMETAL'));
     }
 }
Likely I’ll make a new pull request to have this in the test distribution, but for now this is good enough to help kernel developers
to do some self-service and trigger their own openQA tests, that have many more tests (hopefully in parallel) and faster than if there
was a person doing all of this manually.
Special thanks to the QE Kernel team, who do the amazing job of thinking of some scenarios like this, because they save a lot
of time.
Users can now add their Matrix accounts to their profile in Launchpad, as requested by Canonical’s Community team.
We also took the chance to slightly rework the frontend and how we display social accounts in the user profiles. Instead of having different sections in the profile for each social account , all social accounts are now all under a “Social Accounts” section.
Adding a new matrix account to your profile works similarly to how it has always worked for other accounts. Under the “Social Accounts” section in your user profile, you should now see a “No matrix accounts registered” and an edit button that will lead you to the Matrix accounts edit page. To edit, remove or add new ones, you will see an edit button in front of your newly added accounts in your profile.
We also added new API endpoints Person.social_accounts and Person.getSocialAccountsByPlatform() that will list the social accounts for a user. For more information, see our API documentation.
Currently, only Matrix was added as a social platform. But during this process, we made it much easier for Launchpad developers to add new social platforms to Launchpad in the future.
This post is in part a response to an aspect of Nate’s post “Does Wayland really break everything?“, but also my reflection on discussing Wayland protocol additions, a unique pleasure that I have been involved with for the past months1.
Some facts
Before I start I want to make a few things clear: The Linux desktop will be moving to Wayland2 – this is a fact at this point (and has been for a while), sticking to X11 makes no sense for future projects. From reading Wayland protocols and working with it at a much lower level than I ever wanted to, it is also very clear to me that Wayland is an exceptionally well-designed core protocol, and so are the additional extension protocols (xdg-shell & Co.). The modularity of Wayland is great, it gives it incredible flexibility and will for sure turn out to be good for the long-term viability of this project (and also provides a path to correct protocol issues in future, if one is found). In other words: Wayland is an amazing foundation to build on, and a lot of its design decisions make a lot of sense!
The shift towards people seeing “Linux” more as an application developer platform, and taking PipeWire and XDG Portals into account when designing for Wayland is also an amazing development and I love to see this – this holistic approach is something I always wanted!
Furthermore, I think Wayland removes a lot of functionality that shouldn’t exist in a modern compositor – and that’s a good thing too! Some of X11’s features and design decisions had clear drawbacks that we shouldn’t replicate. I highly recommend to read Nate’s blog post, it’s very good and goes into more detail. And due to all of this, I firmly believe that any advancement in the Wayland space must come from within the project.
But!
But! Of course there was a “but” coming – I think while developing Wayland-as-an-ecosystem we are now entrenched into narrow concepts of how a desktop should work. While discussing Wayland protocol additions, a lot of concepts clash, people from different desktops with different design philosophies debate the merits of those over and over again never reaching any conclusion (just as you will never get an answer out of humans whether sushi or pizza is the clearly superior food, or whether CSD or SSD is better). Some people want to use Wayland as a vehicle to force applications to submit to their desktop’s design philosophies, others prefer the smallest and leanest protocol possible, other developers want the most elegant behavior possible. To be clear, I think those are all very valid approaches.
But this also creates problems: By switching to Wayland compositors, we are already forcing a lot of porting work onto toolkit developers and application developers. This is annoying, but just work that has to be done. It becomes frustrating though if Wayland provides toolkits with absolutely no way to reach their goal in any reasonable way. For Nate’s Photoshop analogy: Of course Linux does not break Photoshop, it is Adobe’s responsibility to port it. But what if Linux was missing a crucial syscall that Photoshop needed for proper functionality and Adobe couldn’t port it without that? In that case it becomes much less clear on who is to blame for Photoshop not being available.
A lot of Wayland protocol work is focused on the environment and design, while applications and work to port them often is considered less. I think this happens because the overlap between application developers and developers of the desktop environments is not necessarily large, and the overlap with people willing to engage with Wayland upstream is even smaller. The combination of Windows developers porting apps to Linux and having involvement with toolkits or Wayland is pretty much nonexistent. So they have less of a voice.
A quick detour through the neuroscience research lab
I have been involved with Freedesktop, GNOME and KDE for an incredibly long time now (more than a decade), but my actual job (besides consulting for Purism) is that of a PhD candidate in a neuroscience research lab (working on the morphology of biological neurons and its relation to behavior). I am mostly involved with three research groups in our institute, which is about 35 people. Most of us do all our data analysis on powerful servers which we connect to using RDP (with KDE Plasma as desktop). Since I joined, I have been pushing the envelope a bit to extend Linux usage to data acquisition and regular clients, and to have our data acquisition hardware interface well with it. Linux brings some unique advantages for use in research, besides the obvious one of having every step of your data management platform introspectable with no black boxes left, a goal I value very highly in research (but this would be its own blogpost).
In terms of operating system usage though, most systems are still Windows-based. Windows is what companies develop for, and what people use by default and are familiar with. The choice of operating system is very strongly driven by application availability, and WSL being really good makes this somewhat worse, as it removes the need for people to switch to a real Linux system entirely if there is the occasional software requiring it. Yet, we have a lot more Linux users than before, and use it in many places where it makes sense. I also developed a novel data acquisition software that even runs on Linux-only and uses the abilities of the platform to its fullest extent. All of this resulted in me asking existing software and hardware vendors for Linux support a lot more often. Vendor-customer relationship in science is usually pretty good, and vendors do usually want to help out. Same for open source projects, especially if you offer to do Linux porting work for them… But overall, the ease of use and availability of required applications and their usability rules supreme. Most people are not technically knowledgeable and just want to get their research done in the best way possible, getting the best results with the least amount of friction.
KDE/Linux usage at a control station for a particle accelerator at Adlershof Technology Park, Germany, for reference (by 25years of KDE)3
Back to the point
The point of that story is this: GNOME, KDE, RHEL, Debian or Ubuntu: They all do not matter if the necessary applications are not available for them. And as soon as they are, the easiest-to-use solution wins. There are many facets of “easiest”: In many cases this is RHEL due to Red Hat support contracts being available, in many other cases it is Ubuntu due to its mindshare and ease of use. KDE Plasma is also frequently seen, as it is perceived a bit easier to onboard Windows users with it (among other benefits). Ultimately, it comes down to applications and 3rd-party support though.
Here’s a dirty secret: In many cases, porting an application to Linux is not that difficult. The thing that companies (and FLOSS projects too!) struggle with and will calculate the merits of carefully in advance is whether it is worth the support cost as well as continuous QA/testing. Their staff will have to do all of that work, and they could spend that time on other tasks after all.
So if they learn that “porting to Linux” not only means added testing and support, but also means to choose between the legacy X11 display server that allows for 1:1 porting from Windows or the “new” Wayland compositors that do not support the same features they need, they will quickly consider it not worth the effort at all. I have seen this happen.
Of course many apps use a cross-platform toolkit like Qt, which greatly simplifies porting. But this just moves the issue one layer down, as now the toolkit needs to abstract Windows, macOS and Wayland. And Wayland does not contain features to do certain things or does them very differently from e.g. Windows, so toolkits have no way to actually implement the existing functionality in a way that works on all platforms. So in Qt’s documentation you will often find texts like “works everywhere except for on Wayland compositors or mobile”4.
Many missing bits or altered behavior are just papercuts, but those add up. And if users will have a worse experience, this will translate to more support work, or people not wanting to use the software on the respective platform.
What’s missing?
Window positioning
SDI applications with multiple windows are very popular in the scientific world. For data acquisition (for example with microscopes) we often have one monitor with control elements and one larger one with the recorded image. There is also other configurations where multiple signal modalities are acquired, and the experimenter aligns windows exactly in the way they want and expects the layout to be stored and to be loaded upon reopening the application. Even in the image from Adlershof Technology Park above you can see this style of UI design, at mega-scale. Being able to pop-out elements as windows from a single-window application to move them around freely is another frequently used paradigm, and immensely useful with these complex apps.
It is important to note that this is not a legacy design, but in many cases an intentional choice – these kinds of apps work incredibly well on larger screens or many screens and are very flexible (you can have any window configuration you want, and switch between them using the (usually) great window management abilities of your desktop).
Of course, these apps will work terribly on tablets and small form factors, but that is not the purpose they were designed for and nobody would use them that way.
I assumed for sure these features would be implemented at some point, but when it became clear that that would not happen, I created the ext-placement protocol which had some good discussion but was ultimately rejected from the xdg namespace. I then tried another solution based on feedback, which turned out not to work for most apps, and now proposed xdg-placement (v2) in an attempt to maybe still get some protocol done that we can agree on, exploring more options before pushing the existing protocol for inclusion into the ext Wayland protocol namespace. Meanwhile though, we can not port any application that needs this feature, while at the same time we are switching desktops and distributions to Wayland by default.
Window position restoration
Similarly, a protocol to save & restore window positions was already proposed in 2018, 6 years ago now, but it has still not been agreed upon, and may not even help multiwindow apps in its current form. The absence of this protocol means that applications can not restore their former window positions, and the user has to move them to their previous place again and again.
Meanwhile, toolkits can not adopt these protocols and applications can not use them and can not be ported to Wayland without introducing papercuts.
Window icons
Similarly, individual windows can not set their own icons, and not-installed applications can not have an icon at all because there is no desktop-entry file to load the icon from and no icon in the theme for them. You would think this is a niche issue, but for applications that create many windows, providing icons for them so the user can find them is fairly important. Of course it’s not the end of the world if every window has the same icon, but it’s one of those papercuts that make the software slightly less user-friendly. Even applications with fewer windows like LibrePCB are affected, so much so that they rather run their app through Xwayland for now.
I decided to address this after I was working on data analysis of image data in a Python virtualenv, where my code and the Python libraries used created lots of windows all with the default yellow “W” icon, making it impossible to distinguish them at a glance. This is xdg-toplevel-icon now, but of course it is an uphill battle where the very premise of needing this is questioned. So applications can not use it yet.
Firefox has a picture-in-picture feature, allowing it to pop out media from a mediaplayer as separate floating window so the user can watch the media while doing other things. On X11 this is easily realized, but on Wayland the restrictions posed on windows necessitate a different solution. The xdg-pip protocol was proposed for this specialized usecase, but it is also not merged yet. So this feature does not work as well on Wayland.
Automation of GUI tasks is a powerful feature, so is the ability to auto-test GUIs. This is being worked on, with libei and wlheadless-run (and stuff like ydotool exists too), but we’re not fully there yet.
Wayland is frustrating for (some) application authors
As you see, there is valid applications and valid usecases that can not be ported yet to Wayland with the same feature range they enjoyed on X11, Windows or macOS. So, from an application author’s perspective, Wayland does break things quite significantly, because things that worked before can no longer work and Wayland (the whole stack) does not provide any avenue to achieve the same result.
Wayland does “break” screen sharing, global hotkeys, gaming latency (via “no tearing”) etc, however for all of these there are solutions available that application authors can port to. And most developers will gladly do that work, especially since the newer APIs are usually a lot better and more robust. But if you give application authors no path forward except “use Xwayland and be on emulation as second-class citizen forever”, it just results in very frustrated application developers.
For some application developers, switching to a Wayland compositor is like buying a canvas from the Linux shop that forces your brush to only draw triangles. But maybe for your avant-garde art, you need to draw a circle. You can approximate one with triangles, but it will never be as good as the artwork of your friends who got their canvases from the Windows or macOS art supply shop and have more freedom to create their art.
Triangles are proven to be the best shape! If you are drawing circles you are creating bad art!
Wayland, via its protocol limitations, forces a certain way to build application UX – often for the better, but also sometimes to the detriment of users and applications. The protocols are often fairly opinionated, a result of the lessons learned from X11. In any case though, it is the odd one out – Windows and macOS do not pose the same limitations (for better or worse!), and the effort to port to Wayland is orders of magnitude bigger, or sometimes in case of the multiwindow UI paradigm impossible to achieve to the same level of polish. Desktop environments of course have a design philosophy that they want to push, and want applications to integrate as much as possible (same as macOS and Windows!). However, there are many applications out there, and pushing a design via protocol limitations will likely just result in fewer apps.
The porting dilemma
I spent probably way too much time looking into how to get applications cross-platform and running on Linux, often talking to vendors (FLOSS and proprietary) as well. Wayland limitations aren’t the biggest issue by far, but they do start to come come up now, especially in the scientific space with Ubuntu having switched to Wayland by default. For application authors there is often no way to address these issues. Many scientists do not even understand why their Python script that creates some GUIs suddenly behaves weirdly because Qt is now using the Wayland backend on Ubuntu instead of X11. They do not know the difference and also do not want to deal with these details – even though they may be programmers as well, the real goal is not to fiddle with the display server, but to get to a scientific result somehow.
Another issue is portability layers like Wine which need to run Windows applications as-is on Wayland. Apparently Wine’s Wayland driver has some heuristics to make window positioning work (and I am amazed by the work done on this!), but that can only go so far.
A way out?
So, how would we actually solve this? Fundamentally, this excessively long blog post boils down to just one essential question:
Do we want to force applications to submit to a UX paradigm unconditionally, potentially loosing out on application ports or keeping apps on X11 eternally, or do we want to throw them some rope to get as many applications ported over to Wayland, even through we might sacrifice some protocol purity?
I think we really have to answer that to make the discussions on wayland-protocols a lot less grueling. This question can be answered at the wayland-protocols level, but even more so it must be answered by the individual desktops and compositors.
If the answer for your environment turns out to be “Yes, we want the Wayland protocol to be more opinionated and will not make any compromises for application portability”, then your desktop/compositor should just immediately NACK protocols that add something like this and you simply shouldn’t engage in the discussion, as you reject the very premise of the new protocol: That it has any merit to exist and is needed in the first place. In this case contributors to Wayland and application authors also know where you stand, and a lot of debate is skipped. Of course, if application authors want to support your environment, you are basically asking them now to rewrite their UI, which they may or may not do. But at least they know what to expect and how to target your environment.
If the answer turns out to be “We do want some portability”, the next question obviously becomes where the line should be drawn and which changes are acceptable and which aren’t. We can’t blindly copy all X11 behavior, some porting work to Wayland is simply inevitable. Some written rules for that might be nice, but probably more importantly, if you agree fundamentally that there is an issue to be fixed, please engage in the discussions for the respective MRs! We for sure do not want to repeat X11 mistakes, and I am certain that we can implement protocols which provide the required functionality in a way that is a nice compromise in allowing applications a path forward into the Wayland future, while also being as good as possible and improving upon X11. For example, the toplevel-icon proposal is already a lot better than anything X11 ever had. Relaxing ACK requirements for the ext namespace is also a good proposed administrative change, as it allows some compositors to add features they want to support to the shared repository easier, while also not mandating them for others. In my opinion, it would allow for a lot less friction between the two different ideas of how Wayland protocol development should work. Some compositors could move forward and support more protocol extensions, while more restrictive compositors could support less things. Applications can detect supported protocols at launch and change their behavior accordingly (ideally even abstracted by toolkits).
You may now say that a lot of apps are ported, so surely this issue can not be that bad. And yes, what Wayland provides today may be enough for 80-90% of all apps. But what I hope the detour into the research lab has done is convince you that this smaller percentage of apps matters. A lot. And that it may be worthwhile to support them.
To end on a positive note: When it came to porting concrete apps over to Wayland, the only real showstoppers so far5 were the missing window-positioning and window-position-restore features. I encountered them when porting my own software, and I got the issue as feedback from colleagues and fellow engineers. In second place was UI testing and automation support, the window-icon issue was mentioned twice, but being a cosmetic issue it likely simply hurts people less and they can ignore it easier.
What this means is that the majority of apps are already fine, and many others are very, very close! A Wayland future for everyone is within our grasp!
I will also bring my two protocol MRs to their conclusion for sure, because as application developers we need clarity on what the platform (either all desktops or even just a few) supports and will or will not support in future. And the only way to get something good done is by contribution and friendly discussion.
Footnotes
Apologies for the clickbait-y title – it comes with the subject ︎
When I talk about “Wayland” I mean the combined set of display server protocols and accepted protocol extensions, unless otherwise clarified. ︎
I would have picked a picture from our lab, but that would have needed permission first ︎
Qt has awesome “platform issues” pages, like for macOS and Linux/X11 which help with porting efforts, but Qt doesn’t even list Linux/Wayland as supported platform. There is some information though, like window geometry peculiarities, which aren’t particularly helpful when porting (but still essential to know). ︎
Besides issues with Nvidia hardware – CUDA for simulations and machine-learning is pretty much everywhere, so Nvidia cards are common, which causes trouble on Wayland still. It is improving though. ︎
Every so often I have to make a new virtual machine for some specific use case. Perhaps I need a newer version of Ubuntu than the one I’m running on my hardware in order to build some software, and containerization just isn’t working. Or maybe I need to test an app that I made modifications to in a fresh environment. In these instances, it can be quite helpful to be able to spin up these virtual machines quickly, and only install the bare minimum software you need for your use case.
One common strategy when making a minimal or specially customized install is to use a server distro (like Ubuntu Server for instance) as the base and then install other things on top of it. This sorta works, but it’s less than ideal for a couple reasons:
Server distros are not the same as minimal distros. They may provide or offer software and configurations that are intended for a server use case. For instance, the ubuntu-server metapackage in Ubuntu depends on software intended for RAID array configuration and logical volume management, and it recommends software that enables LXD virtual machine related features. Chances are you don’t need or want these sort of things.
They can be time-consuming to set up. You have to go through the whole server install procedure, possibly having to configure or reconfigure things that are pointless for your use case, just to get the distro to install. Then you have to log in and customize it, adding an extra step.
If you’re able to use Debian as your distro, these problems aren’t so bad since Debian is sort of like Arch Linux - there’s a minimal base that you build on to turn it into a desktop or server. But for Ubuntu, there’s desktop images (not usually what you want), server images (not usually what you want), cloud images (might be usable but could be tricky), and Ubuntu Core images (definitely not what you want for most use cases). So how exactly do you make a minimal Ubuntu VM?
As hinted at above, a cloud image might work, but we’re going to use a different solution here. As it turns out, you don’t actually have to use a prebuilt image or installer to install Ubuntu. Similar to the installation procedure Arch Linux provides, you can install Ubuntu manually, giving you very good control over what goes into your VM and how it’s configured.
This guide is going to be focused on doing a manual installation of Ubuntu into a VM, using debootstrap to install the initial minimal system. You can use this same technique to install Ubuntu onto physical hardware by just booting from a live USB and then using this technique on your hardware’s physical disk(s). However we’re going to be primarily focused on using a VM right now. Also, the virtualization software we’re going to be working with is QEMU. If you’re using a different hypervisor like VMware, VirtualBox, or Hyper-V, you can make a new VM and then install Ubuntu manually into it the same way you would install Ubuntu onto physical hardware using this technique. QEMU, however, provides special tools that make this procedure easier, and QEMU is more flexible than other virtualization software in my experience. You can install it by running sudo apt install qemu-system-x86 on your host system.
With that laid out, let us begin.
Open a terminal on your physical machine, and make a directory for your new VM to reside in. I’ll use “~/VMs/Ubuntu” here.
mkdir ~/VMs/Ubuntu
cd ~/VMs/Ubuntu
Next, let’s make a virtual disk image for the VM using the qemu-img utility.
qemu-img create -f qcow2 ubuntu.img 32G
This will make a 32 GiB disk image - feel free to customize the size or filename as you see fit. The -f parameter at the beginning specifies the VM disk image format. QCOW2 is usually a good option since the image will start out small and then get bigger as necessary. However, if you’re already using a copy-on-write filesystem like BTRFS or ZFS, you might want to use -f raw rather than -f qcow2 - this will make a raw disk image file and avoid the overhead of the QCOW2 file format.
Now we need to attach the disk image to the host machine as a device. I usually do this with you can use qemu-nbd, which can attach a QEMU-compatible disk image to your physical system as a network block device. These devices look and work just like physical disks, which makes them extremely handy for modifying the contents of a disk image.
qemu-nbd requires that the nbd kernel module be loaded, and at least on Ubuntu, it’s not loaded by default, so we need to load it before we can attach the disk image to our host machine.
This will make our ubuntu.img file available through the /dev/nbd0 device. Make sure to specify the format via the -f switch, especially if you’re using a raw disk image. QEMU will keep you from writing a new partition table to the disk image if you give it a raw disk image without telling it directly that the disk image is raw.
Once your disk image is attached, we can partition it and format it just like a real disk. For simplicity’s sake, we’ll give the drive an MBR partition table, create a single partition enclosing all of the disk’s space, then format the partition as ext4.
sudo fdisk /dev/nbd0
n
p
1


w
sudo mkfs.ext4 /dev/nbd0p1
(The two blank lines are intentional - they just accept the default options for the partition’s first and last sector, which makes a partition that encloses all available space on the disk.)
Now we can mount the new partition.
mkdir vdisk
sudo mount /dev/nbd0p1 ./vdisk
Now it’s time to install the minimal Ubuntu system. You’ll need to know the first part of the codename for the Ubuntu version you intend to install. The codenames for Ubuntu releases are an adjective followed by the name of an animal, like “Jammy Jellyfish”. The first word (“Jammy” in this instance) is the one you need. These codenames are easy to look up online. Here’s the codenames for the currently supported LTS versions of Ubuntu, as well as the codename for the current development release:
To install the initial minimal Ubuntu system, we’ll use the debootstrap utility. This utility will download and install the bare minimum packages needed to have a functional Ubuntu system. Keep in mind that the Ubuntu installation this tool makes is really minimal - it doesn’t even come with a bootloader or Linux kernel. We’ll need to make quite a few changes to this installation before it’s ready for use in a VM.
Assuming we’re installing Ubuntu 22.04 LTS into our VM, the command to use is:
sudo debootstrap jammy ./vdisk
After a few minutes, our new system should be downloaded and installed. (Note that debootstrap does require root privileges.)
Now we’re ready to customize the VM! To do this, we’ll use a utility called chroot - this utility allows us to “enter” an installed Linux system, so we can modify with it without having to boot it. (This is done by changing the root directory (from the perspective of the chroot process) to whatever directory you specify, then launching a shell or program inside the specified directory. The shell or program will see its root directory as being the directory you specified, and volia, it’s as if we’re “inside” the installed system without having to boot it. This is a very weak form of containerization and shouldn’t be relied on for security, but it’s perfect for what we’re doing.)
There’s one thing we have to account for before chrooting into our new Ubuntu installation. Some commands we need to run will assume that certain special directories are mounted properly - in particular, /proc should point to a procfs filesystem, /sys should point to a sysfs filesystem, /dev needs to contain all of the device files of our system, and /dev/pts needs to contain the device files for pseudoterminals (you don’t have to know what any of that means, just know that those four directories are important and have to be set up properly). If these directories are not properly mounted, some tools will behave strangely or not work at all. The easiest way to solve this problem is with bind mounts. These basically tell Linux to make the contents of one directory visible in some other directory too. (These are sort of like symlinks, but they work differently - a symlink says “I’m a link to something, go over here to see what I contain”, whereas a bind mount says “make this directory’s contents visible over here too”. The differences are subtle but important - a symlink can’t make files outside of a chroot visible inside the chroot. A bind mount, however, can.)
So let’s bind mount the needed directories from our system into the chroot:
sudo mount --bind /dev ./vdisk/dev
sudo mount --bind /proc ./vdisk/proc
sudo mount --bind /sys ./vdisk/sys
sudo mount --bind /dev/pts ./vdisk/dev/pts
And now we can chroot in!
sudo chroot ./vdisk
Run ping -c1 8.8.8.8 just to make sure that Internet access is working - if it’s not, you may need to copy the host’s /etc/resolv.conf file into the VM. However, you probably won’t have to do this. Assuming Internet is working, we can now start customizing things.
By default, debootstrap only enables the “main” repository of Ubuntu. This repository only contains free-and-open-source software that is supported by Canonical. This does *not* include most of the software available in Ubuntu - most of it is in the “universe”, “restricted”, and “multiverse” repositories. If you really know what you’re doing, you can leave some of these repositories out, but I would highly recommend you enable them. Also, only the “release” pocket is enabled by default - this pocket includes all of the software that came with your chosen version of Ubuntu when it was first released, but it doesn’t include bug fixes, security updates, or newer versions of software. All those are in the “updates”, “security”, and “backports” pockets.
To fix this, run the following block of code, adjusted for your release of Ubuntu:
tee /etc/apt/sources.list << ENDSOURCESLIST
deb http://archive.ubuntu.com/ubuntu jammy main universe restricted multiverse
deb http://archive.ubuntu.com/ubuntu jammy-updates main universe restricted multiverse
deb http://archive.ubuntu.com/ubuntu jammy-security main universe restricted multiverse
deb http://archive.ubuntu.com/ubuntu jammy-backports main universe restricted multiverse
ENDSOURCESLIST
Replace “jammy” with the codename corresponding to your chosen release of Ubuntu. Once you’ve run this, run cat /etc/apt/sources.list to make sure the file looks right, then run apt update to refresh your software database with the newly enabled repositories. Once that’s done, run apt full-upgrade to update any software in the base installation that’s out-of-date.
What exactly you install at this point is up to you, but here’s my list of recommendations:
linux-generic. Highly recommended. This provides the Linux kernel. Without it, you’re going to have significant trouble booting. You can replace this with a different kernel metapackage if you want to for some reason (like linux-lowlatency).
grub-pc. Highly recommended. This is the bootloader. You might be able to replace this with an alternative bootloader like systemd-boot.
vim (or some other decent text editor that runs in a terminal). Highly recommended. The minimal install of Ubuntu doesn’t come with a good text editor, and you’ll really want one of those most likely.
network-manager. Highly recommended. If you don’t install this or some other network manager, you won’t have Internet access. You can replace this with an alternative network manager if you’d like.
tmux. Recommended. Unless you’re going to install a graphical environment, you’ll probably want a terminal multiplexer so you don’t have to juggle TTYs (which is especially painful in QEMU).
openssh-server. Optional. This is handy since it lets you use your terminal emulator of choice on your physical machine to interface with the virtual machine. You won’t be stuck using a rather clumsy and slow TTY in a QEMU display.
pulseaudio. Very optional. Provides sound support within the VM.
icewm + xserver-xorg + xinit + xterm. Very optional. If you need or want a graphical environment, this should provide you with a fairly minimal and fast one. You’ll still log in at a TTY, but you can use startx to start a desktop.
Add whatever software you want to this list, remove whatever you don’t want, and then install it all with this command:
apt install listOfPackages
Replace “listOfPackages” with the actual list of packages you want to install. For instance, if I were to install everything in the above list except openssh-server, I would use:
At this point our software is installed, but the VM still has a few things needed to get it going.
We need to install and configure the bootloader.
We need an /etc/fstab file, or the system will boot with the drive mounted read-only.
We should probably make a non-root user with sudo access.
There’s a file in Ubuntu that will prevent Internet access from working. We should delete it now.
The bootloader is pretty easy to install and configure. Just run:
sudo grub-install /dev/nbd0
sudo update-grub
For /etc/fstab, there are a few options. One particularly good one is to label the partition we installed Ubuntu into using e2label, then use that label as the ID of the drive we want to mount as root. That can be done like this:
adduser user   # follow the prompts to create the user
adduser user sudo
And lastly, we should remove the Internet blocker file. I don’t understand why exactly this file exists in Ubuntu, but it does, and it causes problems for me when I make a minimal VM in this way. Removing it fixes the problem.
EDIT: January 21, 2024: This rm command doesn’t actually work forever - an update to NetworkManager can end up putting this file back, breaking networking again. Rather than using rm on it, you should dpkg-divert it somewhere benign, for instance with dpkg-divert --divert /usr/lib/NetworkManager/conf.d/10-globally-managed-devices.conf --rename /var/nm-globally-managed-devices-junk.old, which should persist even after an update.
And that’s it! Now we can exit the chroot, unmount everything, and detach the disk image from our host machine.
Now we can try and boot the VM. But before doing that, it’s probably a good idea to make a VM launcher script. Run vim ./startVM.sh (replacing “vim” with your text editor of choice), then type the following contents into the file:
Refer to the qemu-system-x86_64 manpage or QEMU Invocation documentation page at https://www.qemu.org/docs/master/system/invocation.html for more info on what all these options do. Basically this gives you a VM with 4 GB RAM, 2 CPU cores, decent graphics (not 3d accelerated but not as bad as plain VGA), and audio support. You can tweak the amount of RAM and number of CPU cores by changing the -m and -smp parameters respectively. You’ll have access to the QEMU monitor through whatever terminal you run the launcher script in, allowing you to do things like switch to a different TTY, insert and remove devices and storage media on the fly, and things like that.
Finally, it’s time to see if it works.
chmod +x ./startVM.sh
./startVM.sh
If all goes well, the VM should boot and you should be able to log in! If you installed IceWM and its accompanying software like mentioned earlier, try running startx once you log in. This should pop open a functional IceWM desktop.
Some other things you should test once you’re logged in:
Do you have Internet access? ping -c1 8.8.8.8 can be used to test. If you don’t have Internet, run sudo nmtui in a terminal and add a new Ethernet network within the VM, then try activating it. If you get an error about the Ethernet device being strictly unmanaged, you probably forgot to remove the /usr/lib/NetworkManager/conf.d/10-globally-managed-devices.conf file mentioned earlier.
Can you write anything to the drive? Try running touch test to make sure. If you can’t, you probably forgot to create the /etc/fstab file.
If either of these things don’t work, you can power off the VM, then re-attach the VM’s virtual disk to your host machine, mount it, and chroot in like this:
You now have a fully functional, minimal VM! Some extra tips that you may find handy:
If you choose to install an SSH server into your VM, you can use the “hostfwd” setting in QEMU to forward a port on your local machine to port 22 within the VM. This will allow you to SSH into the VM. Add a parameter like -nic user,hostfwd=tcp:127.0.0.1:2222-:22 to your QEMU command in the “startVM.sh” script. This will forward port 2222 of your host machine to port 22 of the VM. Then you can SSH into the VM by running ssh user@127.0.0.1 -p 2222. The “hostfwd” QEMU feature is documented at https://www.qemu.org/docs/master/system/invocation.html - just search the page for “hostfwd” to find it.
If you intend to use the VM through SSH only and don’t want a QEMU window at all, remove the following three parameters from the QEMU command in “startVM.sh”:
-vga qxl
-display sdl
-monitor stdio
Then add the following switch:
-nographic
This will disable the graphical QEMU window entirely and provide no video hardware to the VM.
You can disable sound support by removing the following switches from the QEMU command in “startVM.sh”:
-device intel-hda
-device hda-duplex
There’s lots more you can do with QEMU and manual Ubuntu installations like this, but I think this should give you a good start. Hope you find this useful! God bless.
Thanks for reading Arraybolt's Archives! Subscribe for free to receive new posts and support my work.
I was hoping to review either Wayland only or immutable only (think ostree/flatpak/snaps etc) but for various reasons on my setup it would just be a Gnome compare and that's just not as interesting. There are just to many distros/variants for me to do a full followup.
Lubuntu has previously always been the winner, so let's just see how Lubuntu 23.10 is doing today.
Previously in 2020 Lubuntu needed to get to 585 MB to be able to run something with a livecd. With a fresh install today Lubuntu can still launch Qterminal with just 540 MB of RAM (not apples to apples, but still)! And that's without Zram that it had last time.
I decided to try removing some parts of the base system to see the cost of each component (with 10MB accuracy). I disabled networking to try and make it a fairer compare.
Snapd - 30 MiB
Printing - cups foomatic - 10 MiB
rsyslog/crons - 10 MiB
Rsyslog impact
Out of the 3 above it's felt more like with rsyslog (and cron) are redundant in modern Linux with systemd. So I tried hitting the log system to see if we could get a slowdown, by every .1 seconds having a service echo lots of gibberish.
After an hour of uptime, this is how much space was used:
syslog 575M
journal at 1008M
CPU Usage on fresh boot after:
With Rsyslog
gibberish service was at 1% CPU usage
rsyslog was at 2-3%
journal was at ~4%
Without Rsyslog
gibberish service was at 1% CPU usage
journal was at 1-3%
That's a pretty extreme case, but does show some impact of rsyslog, which in most desktop settings is redundant anyway.
Testing notes:
2 CPUs (Copy host config)
Lubuntu 23.10 install
no swap file
ext4, no encryption
login automatically
Used Virt-manager and only default change was enabling EUFI


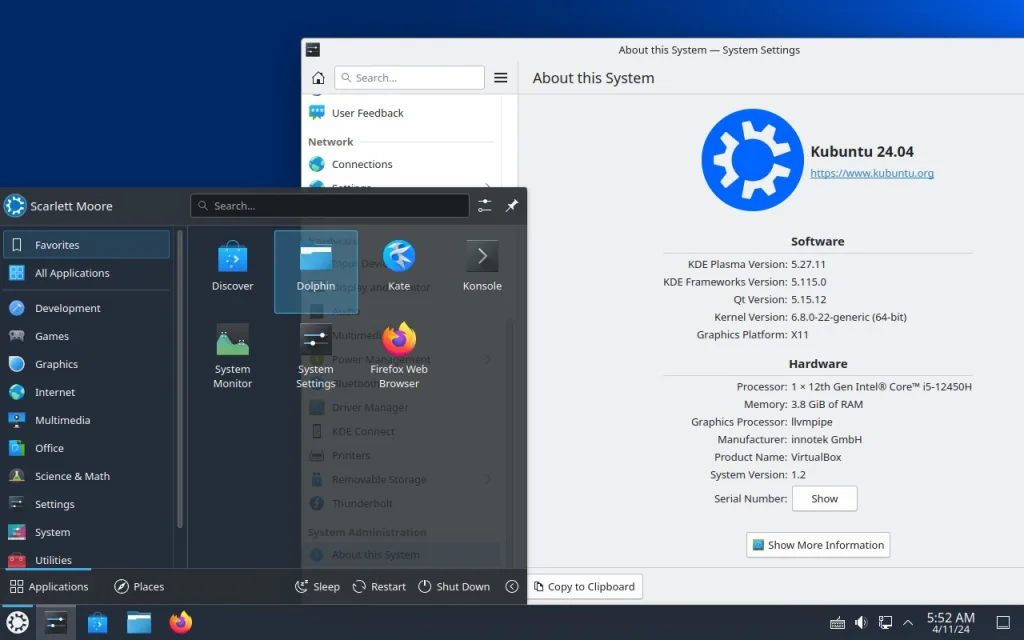


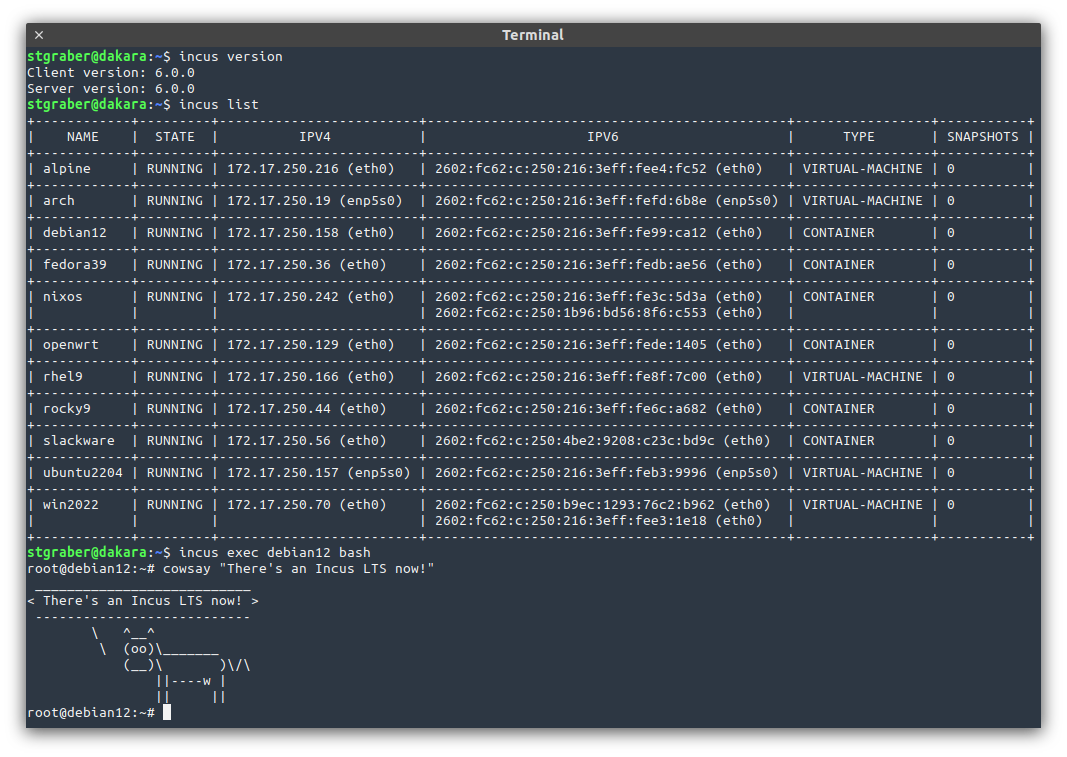

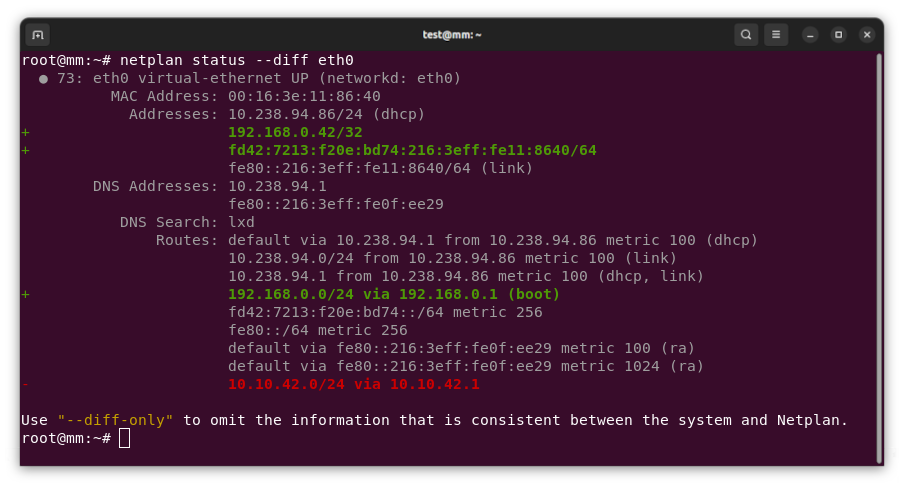


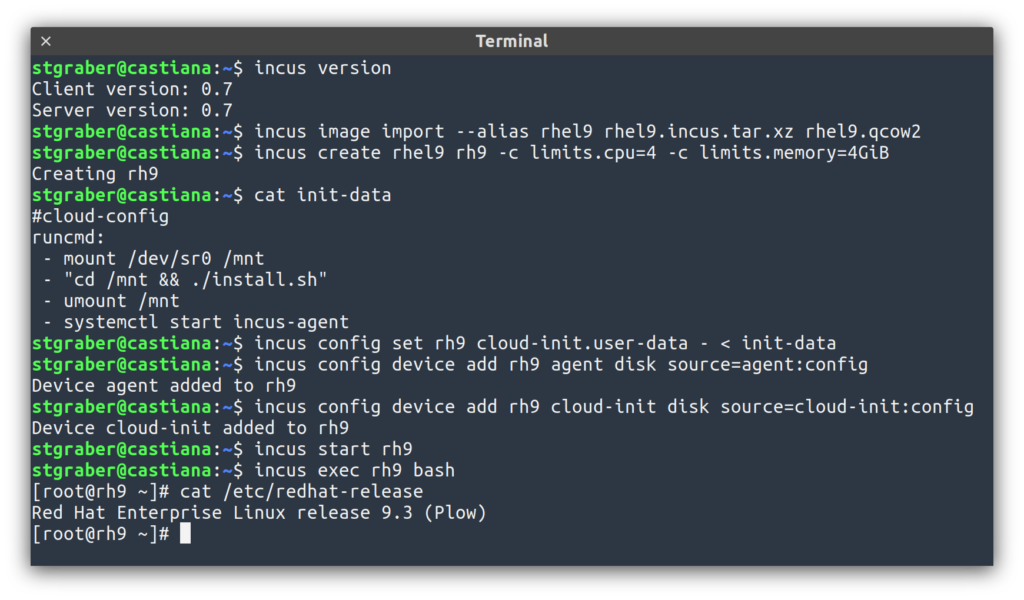


 Interference by Uday Nakade
 Glass Wave 1 Light by Alastair Temple
 Bee 2 by Liber Dovat
 Brauneck Sunrise by Uday Nakade
 Banaue by Jean-Daniel Bancal

 Launchpad yesterday
 Launchpad today


 – I think while developing Wayland-as-an-ecosystem we are now entrenched into narrow concepts of how a desktop should work. While discussing Wayland protocol additions, a lot of concepts clash, people from different desktops with different design philosophies debate the merits of those over and over again never reaching any conclusion (just as you will never get an answer out of humans whether sushi or pizza is the clearly superior food, or whether CSD or SSD is better). Some people want to use Wayland as a vehicle to force applications to submit to their desktop’s design philosophies, others prefer the smallest and leanest protocol possible, other developers want the most elegant behavior possible. To be clear, I think those are all very valid approaches.

 ︎
︎